Orchestrating unstructured data pipeline with Dagster and dlt.
 Zaeem Athar,
Jr. Data Engineer
dlt is an open-source Python library that allows you to declaratively load messy data sources into well-structured tables or datasets, through automatic schema inference and evolution. It simplifies building data pipelines by providing functionality to support the entire extract and load process.
It does so in a scalable way, enabling you to run it on both micro workers or in highly parallelized setups. dlt also offers robustness on extraction by providing state management for incremental extraction, drop-in requests replacement with retries, and many other helpers for common and uncommon extraction cases.
To start with dlt, you can install it using pip: pip install dlt. Afterward, import dlt in your Python script and start building your data pipeline. There's no need to start any backends or containers.
Project Overview:
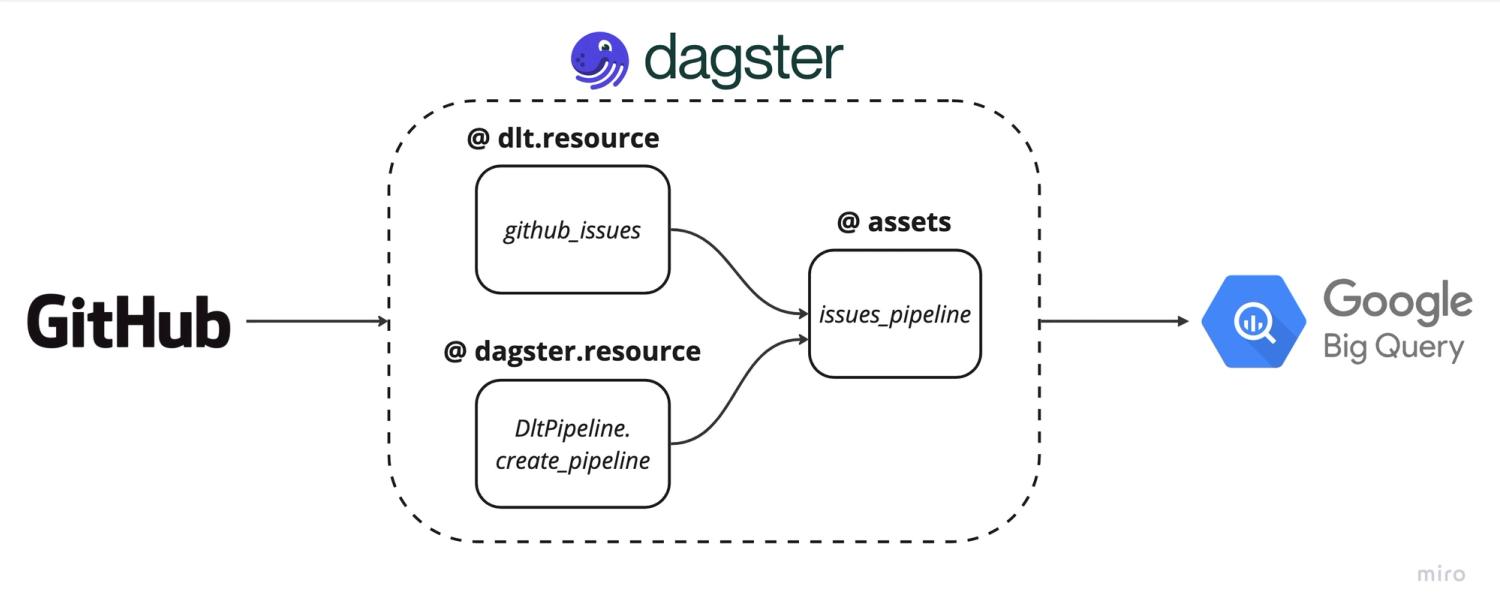
In this example, we will ingest GitHub issue data from a repository and store the data in BigQuery. We will use dlt to create a data pipeline and orchestrate it using Dagster.
Initially, we will start by creating a simple data pipeline using dlt. We will then orchestrate the pipeline using Dagster. Finally, we will add more features to this pipeline by using the dlt schema evolution and Dagster asset metadata to educate the users about their data pipeline.
The project code is available on GitHub.

As we will be ingesting data into BigQuery we first need to create service account credentials for BigQuery. You can find more info on setting up a service account in the dlt docs.
Once we have the credentials we are ready to begin. Let’s first install Dagster and dlt. The below commands should install both.
pip install dlt
pip install dagster dagster-webserverSimple dlt Pipeline:
As a first step, we will create the GitHub issues pipeline using dlt.
dlt init github_issues bigqueryThis will generate a template for us to create a new pipeline. Under .dlt/secrets.toml add the service account credentials for BigQuery. Then in github_issues.py delete the generated code and add the following:
@dlt.resource(write_disposition="append")
def github_issues_resource(api_secret_key=dlt.secrets.value):
owner = 'dlt-hub'
repo = 'dlt'
url = f"https://api.github.com/repos/{owner}/{repo}/issues"
headers = {"Accept": "application/vnd.github.raw+json"}
while url:
response = requests.get(url, headers=headers)
response.raise_for_status() # raise exception if invalid response
issues = response.json()
yield issues
if 'link' in response.headers:
if 'rel="next"' not in response.headers['link']:
break
url = response.links['next']['url'] # fetch next page of stargazers
else:
break
time.sleep(2) # sleep for 2 seconds to respect rate limits
if __name__ == "__main__":
# configure the pipeline with your destination details
pipeline = dlt.pipeline(
pipeline_name='github_issues', destination='bigquery', dataset_name='github_issues_data'
)
# run the pipeline with your parameters
load_info = pipeline.run(github_issues_resource())
#print the information on data that was loaded
print(load_info)The above code creates a simple github_issues pipeline that gets the issues data from the defined repository and loads it into BigQuery. The dlt.resources yields the data while the dlt.pipeline normalizes the nested data and loads it into the defined destination. To read more about the technical details refer to the dlt docs.
To run the pipeline execute the below commands:
pip install -r requirements.txt
python github_issues.pyWe now have a running pipeline and are ready to orchestrate it using Dagster.
Orchestrating using Dagster:
We will need to adjust our pipeline a bit to orchestrate it using Dagster.
Step 1: Create a Dagster project
Create a new directory for your Dagster project and scaffold the basic structure:
mkdir dagster_github_issues
cd dagster_github_issues
dagster project scaffold --name github-issuesThis will generate the default files for Dagster that we will use as a starting point for our data pipeline.
Step 2: Set up the directory structure
- Inside the
github-issues/github_issuesdirectory create the following folders:assets,resources, anddlt.
.
├── README.md
├── github_issues
│ ├── __init__.py
│ ├── assets
│ │ ├── __init__.py
│ ├── dlt
│ │ ├── __init__.py
│ └── resources
│ ├── __init__.py
├── github_issues_tests
│ ├── __init__.py
│ └── test_assets.py
├── pyproject.toml
├── setup.cfg
└── setup.pyStep 3: Add dlt Resources and environment variables
- Copy the previously created github_issues_resource code into
dlt/__init__.pyunder thedltfolder. Remove thedlt.secrets.valueparameter, as we'll pass the credentials through a.envfile. - Create a
.envfile in the root directory. This is the directory where thepyproject.tomlfile exits. Copy the credentials into the.envand follow the correct naming convention. For more info on setting up the.envfile have a look at the docs.
Step 4: Add configurable resources and define the asset
- Define a
DDltResourceclass inresources/__init__.pyas a Dagster configurable resource. This class allows you to reuse pipeline code inside an asset.
from dagster import ConfigurableResource
import dlt
class DDltResource(ConfigurableResource):
pipeline_name: str
dataset_name: str
destination: str
def create_pipeline(self, resource_data, table_name):
# configure the pipeline with your destination details
pipeline = dlt.pipeline(
pipeline_name=self.pipeline_name, destination=self.destination, dataset_name=self.dataset_name
)
# run the pipeline with your parameters
load_info = pipeline.run(dlt_resource, table_name=table_name)
return load_info- Define the asset,
issues_pipeline, inassets/__init__.py. This asset uses the configurable resource to create a dlt pipeline and ingests data into BigQuery.
from dagster import asset, get_dagster_logger
from ..resources import DDltResource
from ..dlt import github_issues_resource
@asset
def issues_pipeline(pipeline: DDltResource):
logger = get_dagster_logger()
results = pipeline.create_pipeline(github_issues_resource, table_name='github_issues')
logger.info(results)- Define the asset,
issues_pipeline, inassets/__init__.py. This asset uses the configurable resource to create a dlt pipeline and ingests data into BigQuery.
from dagster import asset, get_dagster_logger
from ..resources import DDltResource
from ..dlt import github_issues_resource
@asset
def issues_pipeline(pipeline: DDltResource):
logger = get_dagster_logger()
results = pipeline.create_pipeline(github_issues_resource, table_name='github_issues')
logger.info(results)The defined asset (issues_pipeline) takes as input the configurable resource (DDltResource). In the asset, we use the configurable resource to create a dlt pipeline by using an instance of the configurable resource (DDltResource) to call the create_pipeline function. The dlt.resource (github_issues_resource) is passed to the create_pipeline function. The create_pipeline function normalizes the data and ingests it into BigQuery.
Step 5: Handle Schema Evolution
dlt provides the feature of schema evolution that monitors changes in the defined table schema. Suppose GitHub adds a new column or changes a datatype of a column this small change can break pipelines and transformations. The schema evolution feature works amazingly well with Dagster.
Add the schema evolution code to the asset to make our pipelines more resilient to changes.
from dagster import AssetExecutionContext
@asset
def issues_pipeline(context: AssetExecutionContext, pipeline: DDltResource):
...
md_content=""
for package in result.load_packages:
for table_name, table in package.schema_update.items():
for column_name, column in table["columns"].items():
md_content= f"\tTable updated: {table_name}: Column changed: {column_name}: {column['data_type']}"
# Attach the Markdown content as metadata to the asset
context.add_output_metadata(metadata={"Updates": MetadataValue.md(md_content)})Step 6: Define Definitions
- In the
__init.py__under the github_issues folder add the definitions:
all_assets = load_assets_from_modules([assets])
simple_pipeline = define_asset_job(name="simple_pipeline", selection= ['issues_pipeline'])
defs = Definitions(
assets=all_assets,
jobs=[simple_pipeline],
resources={
"pipeline": DDltResource(
pipeline_name = "github_issues",
dataset_name = "dagster_github_issues",
destination = "bigquery",
table_name= "github_issues"
),
}
)Step 7: Run the Web Server and materialize the asset
In the root directory (github-issues) run the dagster dev command to run the web server and materialize the asset.

Step 8: View the populated Metadata and ingested data in BigQuery
Once the asset has been successfully materialized go to the Assets tab from the top and select the Issues_pipeline. In the Metadata you can see the Tables, Columns, and Data Types that have been updated. In this case, the changes are related to internal dlt tables.
Any subsequent changes in the GitHub issues schema can be tracked from the metadata. You can set up Slack notifications to be alerted to schema changes.

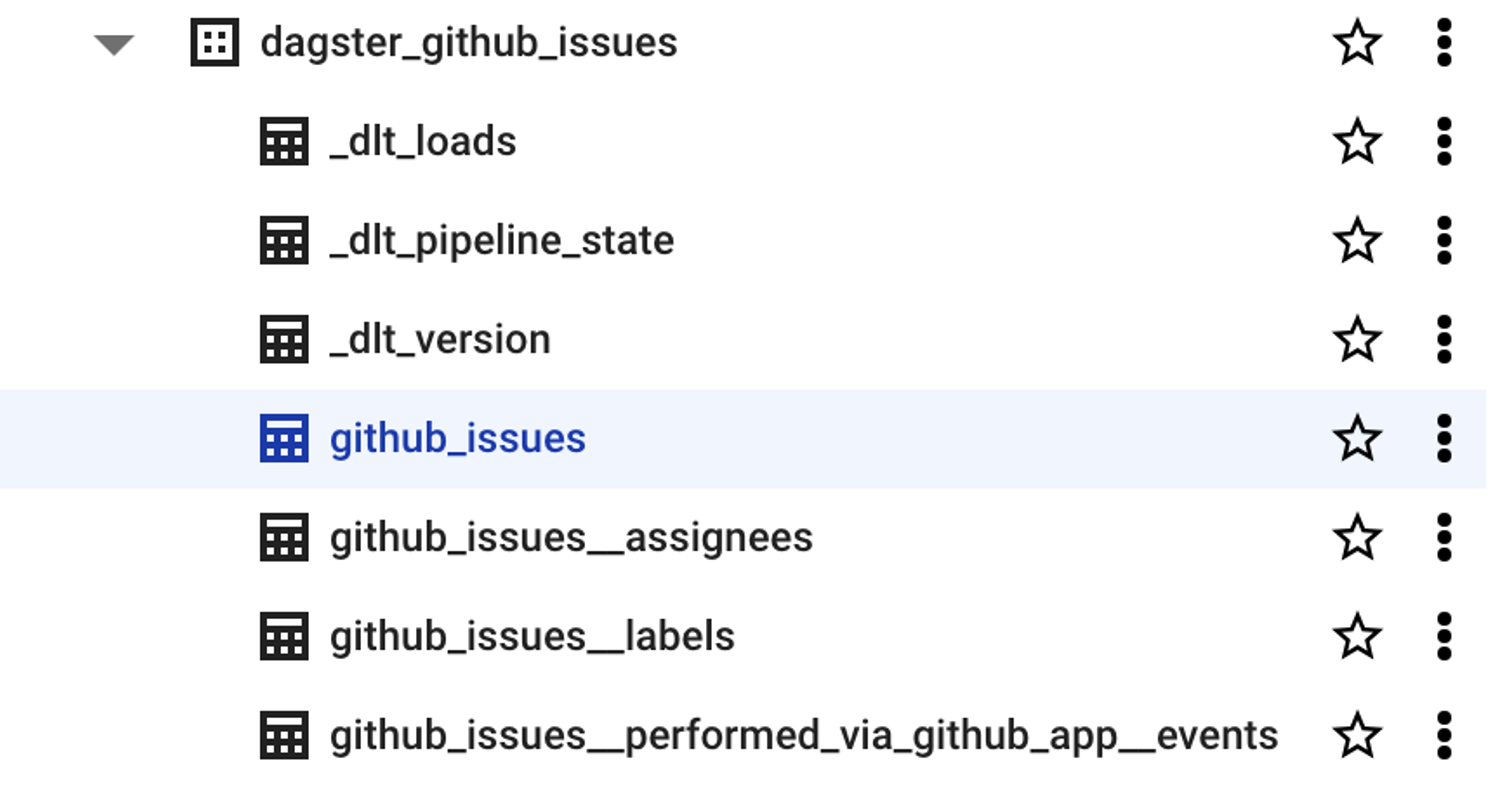
Let's finally have a look in BigQuery to view the ingested data.

The github_issues is the parent table that contains the data from the root level of the JSON returned by the GitHub API. The subsequent table github_issues_assignees is a child table that was nested in the original JSON. dlt normalizes nested data by populating them in separate tables and creates relationships between the tables. To learn more about how dlt created these relationships refer to the docs.
Orchestrating verified dlt source using Dagster:
dlt provides a list of verified sources that can be initialized to fast-track the pipeline-building process. You can find a list of sources provided in the dlt docs.
One of the main strengths of dlt lies in its ability to extract, normalize, and ingest unstructured and semi-structured data from various sources. One of the most commonly used verified source is MongoDB. Let’s quickly look at how we can orchestrate MongoDB source using Dagster.
Step 1: Setting up a Dagster project
Start by creating a new Dagster project scaffold:
dagster project scaffold --name mongodb-dlt- Follow the steps mentioned earlier and create an
assets, andresourcesdirectory undermongodb-dlt/mongodb_dlt. - Initialize a
dltMongoDB pipeline in the same directory
dlt init mongodb bigqueryThis will create a template with all the necessary logic implemented for extracting data from MongoDB. After running the command your directory structure should be as follows:
.
├── README.md
├── mongodb_dlt
│ ├── __init__.py
│ ├── assets
│ │ ├── __init__.py
│ │ └── assets.py
│ ├── mongodb
│ │ ├── README.md
│ │ ├── __init__.py
│ │ └── helpers.py
│ ├── mongodb_pipeline.py
│ ├── requirements.txt
│ └── resources
│ ├── __init__.py
├── mongodb_dlt_tests
│ ├── __init__.py
│ └── test_assets.py
├── pyproject.toml
├── setup.cfg
└── setup.pyStep 2: Configuring MongoDB Atlas and Credentials
For this example, we are using MongoDB Atlas. Set up the account for MongoDB Atlas and use the test Movie Flix Dataset. You can find detailed information on setting up the credentials in the MongoDB verified sources documentation.
Next, create a .env file and add the BigQuery and MongoDB credentials to the file. The .env file should reside in the root directory.
Step 3: Adding the DDltResource
Create a DltResouce under the resources directory. Add the following code to the __init__.py:
from dagster import ConfigurableResource
import dlt
class DDltResource(ConfigurableResource):
pipeline_name: str
dataset_name: str
destination: str
def load_collection(self, resource_data, database):
# configure the pipeline with your destination details
pipeline = dlt.pipeline(
pipeline_name=f"{database}_{self.pipeline_name}", destination=self.destination, dataset_name=f"{self.dataset_name}_{database}"
)
load_info = pipeline.run(resource_data, write_disposition="replace")
return load_infoStep 4: Defining an Asset Factory
The structure of data in MongoDB is such that under each database you will find multiple collections. When writing a data pipeline it is important to separate the data loading for each collection.
Dagster provides the feature of @multi_asset declaration that will allow us to convert each collection under a database into a separate asset. This will make our pipeline easy to debug in case of failure and the collections independent of each other.
In the mongodb_pipeline.py file, locate the load_select_collection_hint_db function. We will use this function to create the asset factory.
In the __init__.py file under the assets directory, define the dlt_asset_factory:
from ..mongodb import mongodb
from ..resources import DDltResource
import dlt
import os
URL = os.getenv('SOURCES__MONGODB__CONNECTION__URL')
DATABASE_COLLECTIONS = {
"sample_mflix": [
"comments",
"embedded_movies",
],
}
def dlt_asset_factory(collection_list):
multi_assets = []
for db, collection_name in collection_list.items():
@multi_asset(
name=db,
group_name=db,
outs={
stream: AssetOut(key_prefix=[f'raw_{db}'])
for stream in collection_name}
)
def collections_asset(context: OpExecutionContext, pipeline: DDltResource):
# Getting Data From MongoDB
data = mongodb(URL, db).with_resources(*collection_name)
logger = get_dagster_logger()
results = pipeline.load_collection(data, db)
logger.info(results)
return tuple([None for _ in context.selected_output_names])
multi_assets.append(collections_asset)
return multi_assets
dlt_assets = dlt_asset_factory(DATABASE_COLLECTIONS)Step 5: Definitions and Running the Web Server
Add the definitions in the __init__.py in the root directory:
from dagster import Definitions
from .assets import dlt_assets
from .resources import DDltResource
defs = Definitions(
assets=dlt_assets,
resources={
"pipeline": DDltResource(
pipeline_name = "mongo",
dataset_name = "dagster_mongo",
destination = "bigquery"
),
}
)We can run the dagster dev command to start the web server. We can see that each collection is converted into a separate asset by Dagster. We can materialize our assets to ingest the data into BigQuery.

The resulting data in BigQuery:

Conclusion:
In this demo, we looked at how to orchestrate dlt pipelines using Dagster. We started by creating a simple dlt pipeline and then converted the pipeline into an asset and resource before orchestrating.
We also looked at how we can orchestrate dlt MongoDB verified sources using Dagster. We utilized the Dagster @multi_asset feature to create a dlt_asset_factory which converts each collection under a database to a separate asset allowing us to create more robust data pipelines.
Both dlt and Dagster can be easily run on local machines. By combining the two we can build data pipelines at great speed and rigorously test them before shipping to production.