Deploy a pipeline with Airflow and Google Composer
Before you can deploy a pipeline, you will need to install dlt and create a pipeline.
While this walkthrough deals specifically with Google Composer, it will generate DAGs and configuration files that you can use on any Airflow deployment. DAGs are generated using dlt Airflow helper that maps dlt resources into Airflow tasks, provides a clean working environment, retry mechanism, metrics, and logging via Airflow loggers.
If you want to explore other ways to run dlt with Airflow, such as using PythonOperator, PythonVirtualenvOperator, KubernetesPodOperator, or external services like Cloud Run, check out this guide by Francesco Mucio. It explains the trade-offs of each approach and helps you choose the right one for your setup.
1. Add your dlt project directory to GitHub
You will need a GitHub repository for your project. If you don't have one yet, you need to
initialize a Git repository in your dlt project directory and push it to GitHub as described in
Adding locally hosted code to GitHub.
2. Ensure your pipeline works
Before you can deploy, you must run your pipeline locally at least once.
python3 {pipeline_name}_pipeline.py
This should successfully load data from the source to the destination once and allows dlt to gather required information for the deployment.
3. Initialize deployment
First, you need to add additional dependencies that the deploy command requires:
pip install "dlt[cli]"
then:
dlt deploy {pipeline_name}_pipeline.py airflow-composer
This command checks if your pipeline has run successfully before and creates the following folders:
-
build
- This folder contains a file called
cloudbuild.yamlwith a simple configuration for cloud deployment. We will use it below.
- This folder contains a file called
-
dags
- This folder contains the Python script
dag_{pipeline_name}.py, which is an example of a simple serialized DAG using the Airflow PipelineTasksGroup wrapper.
Note: This folder is only needed to store DAG scripts, but it is not the Airflow dags_folder. Please refer to the Troubleshooting section for more information.
- This folder contains the Python script
By default, the dlt deploy command shows you the deployment credentials in ENV format.
Example with the pipedrive pipeline
1. Run the deploy command
dlt deploy pipedrive_pipeline.py airflow-composer
where pipedrive_pipeline.py is the pipeline script that you just ran and airflow-composer is a deployment method. The command will create deployment files and provide instructions to set up the credentials.
Your airflow-composer deployment for the pipedrive pipeline is ready!
* The airflow cloudbuild.yaml file was created in the build directory.
* The dag_pipedrive.py script was created in the dags directory.

You must prepare your repository first:
1. Import your sources in dag_pipedrive.py and change default_task_args if necessary.
2. Run the airflow pipeline locally.
See Airflow getting started: https://airflow.apache.org/docs/apache-airflow/stable/start.html

If you are planning to run the pipeline with Google Cloud Composer, follow the next instructions:

1. Read this doc and set up the environment: https://dlthub.com/docs/walkthroughs/deploy-a-pipeline/deploy-with-airflow-composer
2. Set _BUCKET_NAME up in the build/cloudbuild.yaml file.
3. Add the following toml-string to the Airflow UI as the dlt_secrets_toml variable.

[sources.pipedrive]
pipedrive_api_key = "c66..."
The deploy command will use an Airflow variable called dlt_secrets_toml to store all the required secrets as a TOML fragment. You can also use environment variables by passing the --secrets-format env option:
dlt deploy pipedrive_pipeline.py airflow-composer --secrets-format env
which will output the environment variable names and their values.
3. Add the following secret values (typically stored in ./.dlt/secrets.toml):
SOURCES__PIPEDRIVE__PIPEDRIVE_API_KEY

in ENVIRONMENT VARIABLES using Google Composer UI

Name:
SOURCES__PIPEDRIVE__PIPEDRIVE_API_KEY
Secret:
c66c..
2. Modify DAG file
In the directory dags/, you can find the file dag_pipedrive.py that you need to edit. It has the following structure:
import dlt
from airflow.decorators import dag
from dlt.common import pendulum
from dlt.helpers.airflow_helper import PipelineTasksGroup

# Modify the DAG arguments
default_task_args = {
    'owner': 'airflow',
    'depends_on_past': False,
    'email': 'test@test.com',
    'email_on_failure': False,
    'email_on_retry': False,
    'retries': 0,

}

@dag(
    schedule=None,
    start_date=pendulum.DateTime(2021, 1, 1),
    catchup=False,
    max_active_runs=1,
    default_args=default_task_args
)
def load_data():
    # Set `use_data_folder` to True to store temporary data in the `data` bucket.
    # Use only when it does not fit on the local storage
    tasks = PipelineTasksGroup("pipeline_name", use_data_folder=False, wipe_local_data=True)

    # Import your source from the pipeline script
    from pipeline_or_source_script import source

    # Create the pipeline after instance of `PipelineTasksGroup` is created
    pipeline = dlt.pipeline(
        pipeline_name='pipeline_name',
        dataset_name='dataset_name',
        destination='duckdb',
        dev_mode=False  # Must be false if we decompose
    )
    # Create the source, the "serialize" decompose option
    # will convert dlt resources into Airflow tasks.
    # Use "none" to disable it.
    tasks.add_run(
        pipeline,
        source(),
        decompose="serialize",
        trigger_rule="all_done",
        retries=0,
        provide_context=True
    )

    # The "parallel" decompose option will convert dlt
    # resources into parallel Airflow tasks. By default the
    # first source component runs before the rest to safely
    # create the initial schema. Set serialize_first_task=False
    # to fan out all components concurrently.
    # All the tasks will be executed in the same pipeline state.
    # tasks.add_run(
    #   pipeline,
    #   source(),
    #   decompose="parallel",
    #   serialize_first_task=False,  # True by default
    #   trigger_rule="all_done",
    #   retries=0,
    #   provide_context=True
    # )

    # The "parallel-isolated" decompose option will convert dlt
    # resources into parallel Airflow tasks, except the
    # first one, which will be executed before any other tasks.
    # In this mode, all the tasks will use separate pipeline states.
    # tasks.add_run(
    #   pipeline,
    #   source(),
    #   decompose="parallel-isolated",
    #   serialize_first_task=False,  # True by default
    #   trigger_rule="all_done",
    #   retries=0,
    #   provide_context=True
    # )

load_data()
-
Customize the PipelineTaskGroup:
- Change the name from “pipeline_name” to yours, for example, “pipedrive”.
- Change runtime settings: data_folder, logging, retry policy, etc. For example, let’s wipe all the data created by the pipeline (
wipe_local_data=True), redirect the dlt logger into the task logger (use_task_logger=True), and set the retry policy as a Retrying class object with three restart attempts.
from tenacity import Retrying, stop_after_attempt

# Set `use_data_folder` to True to store temporary data in the `data` bucket.
# Use only when it does not fit on the local storage
tasks = PipelineTasksGroup(
    pipeline_name="pipedrive",
    use_data_folder=False,
    wipe_local_data=True,
    use_task_logger=True,
    retry_policy=Retrying(stop=stop_after_attempt(3), reraise=True),
)
When you run the load_data DAG above, Airflow will call the source function every 30 seconds (by default) to be able to monitor the tasks. Make sure that your source function does not perform any long-lasting operations, e.g., reflecting the source database. In the case of sql_database, we added an option to delay database reflection until data is accessed by a resource.
Always instantiate PipelineTasksGroup before creating the dlt.pipeline. The constructor of PipelineTasksGroup overrides the DLT_DATA_DIR environment variable to a fresh random per-worker directory so that Airflow workers, which are reused across DAG runs, do not leak pipeline state between runs.
3. Import sources and move the relevant code from the pipeline script
You should now move your working code from the pipeline script you previously ran to the newly created DAG script.
-
Import your sources from your existing pipeline script - after the task group is created:
# Import your source from the pipeline script
from pipedrive import pipedrive_source
If you create your pipeline instance in your source in the "main" function in your script, then copy it here. For example, look at the
load_from_start_datefunction inpipedrive_pipeline.py:"""Example to incrementally load activities limited to items updated after a given date"""
pipeline = dlt.pipeline(
pipeline_name="pipedrive", destination='duckdb', dataset_name="pipedrive_data"
)
# First source configured to load everything except activities from the beginning
source = pipedrive_source()
source.resources["activities"].selected = False
# Another source configured to load activities starting at the given date (custom_fields_mapping is included to translate custom field hashes to names)
activities_source = pipedrive_source(
since_timestamp="2023-03-01 00:00:00Z"
).with_resources("activities", "custom_fields_mapping")Copy this part of the code to the
dags/dag_pipedrive.pyscript.Note: Task ids in the task group should still be unique globally, so we have to exclude "custom_fields_mapping" from
activities_source. See the Troubleshooting section. -
Pass your pipeline instance and source instance to the
add_runmethod of tasks.Note: PipelineTasksGroup can’t handle the list of sources (e.g., data=[source, activities_source]), so we have to add them sequentially. See the Troubleshooting section.
# Create the source,
# the "serialize" decompose option will convert
# dlt resources into Airflow tasks.
# Use "none" to disable it
tasks.add_run(
    pipeline=pipeline,
    data=source,
    decompose="serialize",
    trigger_rule="all_done",
    retries=0,
    provide_context=True
)

# PipelineTasksGroup can’t handle the list of
# sources (e.g., data=[source, activities_source]),
# so we have to add them sequentially
tasks.add_run(
    pipeline=pipeline,
    data=activities_source,
    decompose="serialize",
    trigger_rule="all_done",
    retries=0,
    provide_context=True
) -
Customize the name of the Airflow DAG by changing the name of the load_data function to your desired name, for example, to
load_pipedrive_data. -
Modify the @dag arguments. Set up schedule, start_date, default_task_args.
As a result, we will get a script of the following form:
import dlt
from airflow.decorators import dag
from dlt.common import pendulum
from dlt.helpers.airflow_helper import PipelineTasksGroup

# Modify the dag arguments
default_task_args = {
    'owner': 'airflow',
    'depends_on_past': False,
    'email': 'test@test.com',
    'email_on_failure': False,
    'email_on_retry': False,
    'retries': 0,

}

@dag(
    schedule=None,
    start_date=pendulum.DateTime(2021, 1, 1),
    catchup=False,
    max_active_runs=1,
    default_args=default_task_args
)
def load_pipedrive_data():
    from tenacity import Retrying, stop_after_attempt

    # Set `use_data_folder` to True to store temporary data on the `data` bucket.
    # Use only when it does not fit on the local storage.
    tasks = PipelineTasksGroup(
        pipeline_name="pipedrive",
        use_data_folder=False,
        wipe_local_data=True,
        use_task_logger=True,
        retry_policy=Retrying(stop=stop_after_attempt(3), reraise=True),
    )

    # Import your source from the pipeline script
    from pipedrive import pipedrive_source

    """Example to incrementally load activities limited to items updated after a given date"""

    pipeline = dlt.pipeline(
        pipeline_name="pipedrive", destination='duckdb', dataset_name="pipedrive_data"
    )

    # First source configured to load everything
    # except activities from the beginning
    source = pipedrive_source()
    source.resources["activities"].selected = False

    # Another source configured to load activities
    # starting at the given date (custom_fields_mapping is included to
    # translate custom field hashes to names)
    activities_source = pipedrive_source(
        since_timestamp="2023-03-01 00:00:00Z"
    ).with_resources("activities")

    # Create the source, the "serialize" decompose option
    # will convert dlt resources into Airflow tasks.
    # Use "none" to disable it.
    tasks.add_run(
        pipeline=pipeline,
        data=source,
        decompose="serialize",
        trigger_rule="all_done",
        retries=0,
        provide_context=True
    )

    # PipelineTasksGroup can’t handle the list of sources
    # (e.g., data=[source, activities_source]),
    # so we have to add them sequentially.
    tasks.add_run(
        pipeline=pipeline,
        data=activities_source,
        decompose="serialize",
        trigger_rule="all_done",
        retries=0,
        provide_context=True
    )

load_pipedrive_data()
4. Add credentials
There are two ways to pass the credentials:
-
In the
dlt_secrets_tomlAirflow variable.-
During the execution of the
deploycommand with--secrets-format toml, secret variables will be displayed in the output:3. Add the following TOML-string to the Airflow UI as the dlt_secrets_toml variable.
[sources.pipedrive]
pipedrive_api_key = "c66c..." -
Launch the Airflow UI, head to the Admin top-level menu, and select Variables.
-
Add a new variable with the name
dlt_secrets_toml. -
Paste the TOML fragment displayed by the
deploycommand. -
💡 The content of this variable will be used by the
dltAirflow helper instead of the localsecrets.tomlwhich you are familiar with. If your local secrets file contains anything else you want to access on Airflow, you are good to just copy the localsecrets.tomlcontent to thedlt_secrets_tomlvariable. -
read more on how to use Airflow Variables to store
dltconfiguration
-
-
As environment variables.
-
During the execution of the
deploycommand with--secrets-format env(by default), environment variables will be displayed in the output:3. Add the following secret values (typically stored in ./.dlt/secrets.toml):
SOURCES__PIPEDRIVE__PIPEDRIVE_API_KEY
in ENVIRONMENT VARIABLES using Google Composer UI
Name:
SOURCES__PIPEDRIVE__PIPEDRIVE_API_KEY
Secret:
c66c... -
Copy capitalized variables and add them into Airflow’s env variables, then save it. Now,
dltcan pick it up.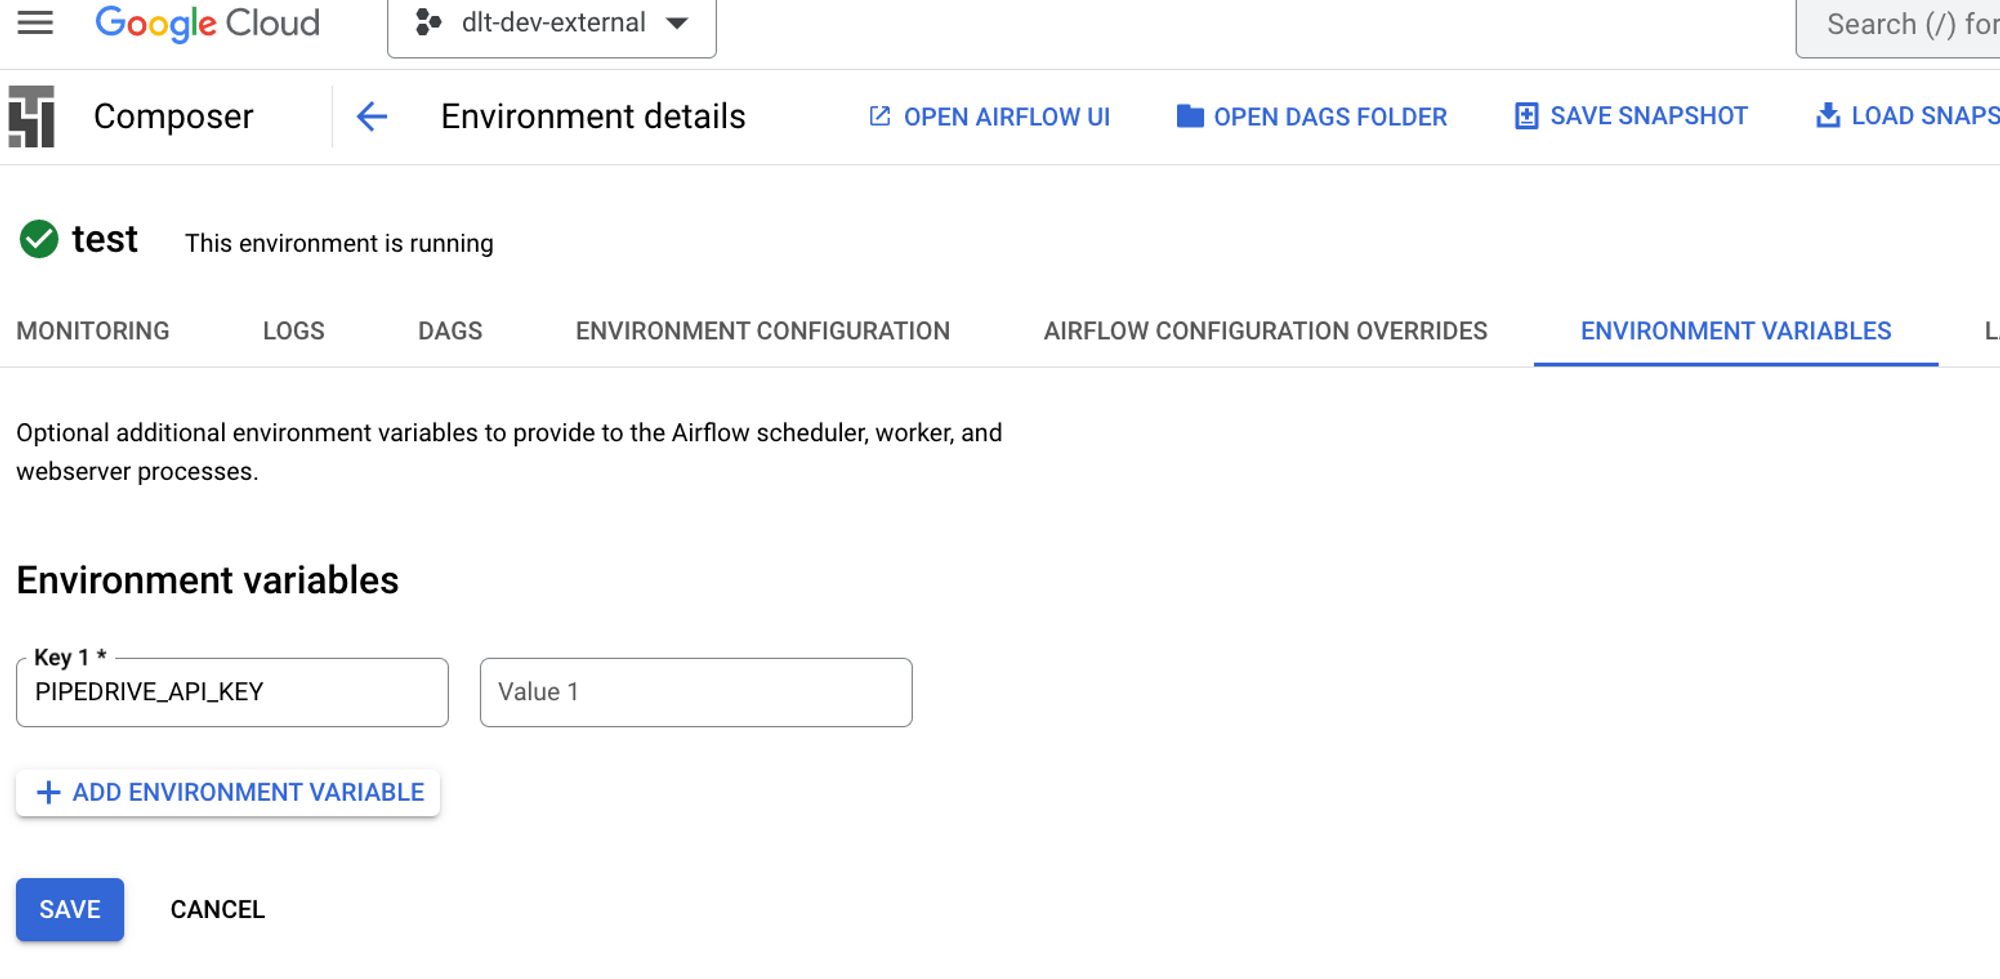
-
5. Configure build/cloudbuild.yaml to run it with Google Cloud Platform [Cloud Composer]
-
See the Continuous Deployment (CD) section below to set up the Cloud Composer environment, create a trigger, and add the libraries needed.
-
Set _BUCKET_NAME up in the
build/cloudbuild.yamlfile.The file has the following structure:
steps:
- name: 'gcr.io/google.com/cloudsdktool/cloud-sdk'
  entrypoint: 'bash'
  args:
  - '-c'
  - gsutil -m rsync -d -r ./ gs://${_BUCKET_NAME}/dags

substitutions:
  _BUCKET_NAME: "set me up!"
options:
  logging: CLOUD_LOGGING_ONLY
This code copies the whole pipeline repository into the bucket’s DAGs folder.
To fill it, we need to get the name of the DAGs bucket from Cloud Composer, so we know where to deploy.
-
Go to Cloud Composer, click on the DAGs folder, and get the bucket name.

-
In your
cloudbuild.yaml, set _BUCKET_NAME up in thesubstitutionssection.substitutions:
_BUCKET_NAME: "set me up!"
-
6. Finish the Airflow deployment
-
Commit and push the pipeline files to GitHub.
Add stage deployment files to commit. Use your Git UI or the following command:
git add dags/dag_pipedrive.py build/cloudbuild.yamlCommit the files above. Use your Git UI or the following command:
git commit -m 'initiate pipedrive pipeline with Airflow'Push changes to GitHub. Use your Git UI or the following command:
git push origin -
Run the trigger you built (in Cloud Build).

-
Wait a minute, and check if your files arrived in the bucket. In our case, we added a whole repository with the
pipedriveproject, and we can see it appeared.
Continuous Deployment (CD)
CI/CD setup
This setup will allow you to deploy the main branch of your Airflow project from GitHub to Cloud Composer.
-
In the Google Cloud web interface, go to Source Repositories and create a repository that mirrors your GitHub repository. This will simplify authentication by using this mirroring service.
-
In Cloud Build, add a trigger on commit to the main branch.
-
Point it to your Cloud Build file. In our example, we place our file at
build/cloudbuild.yaml.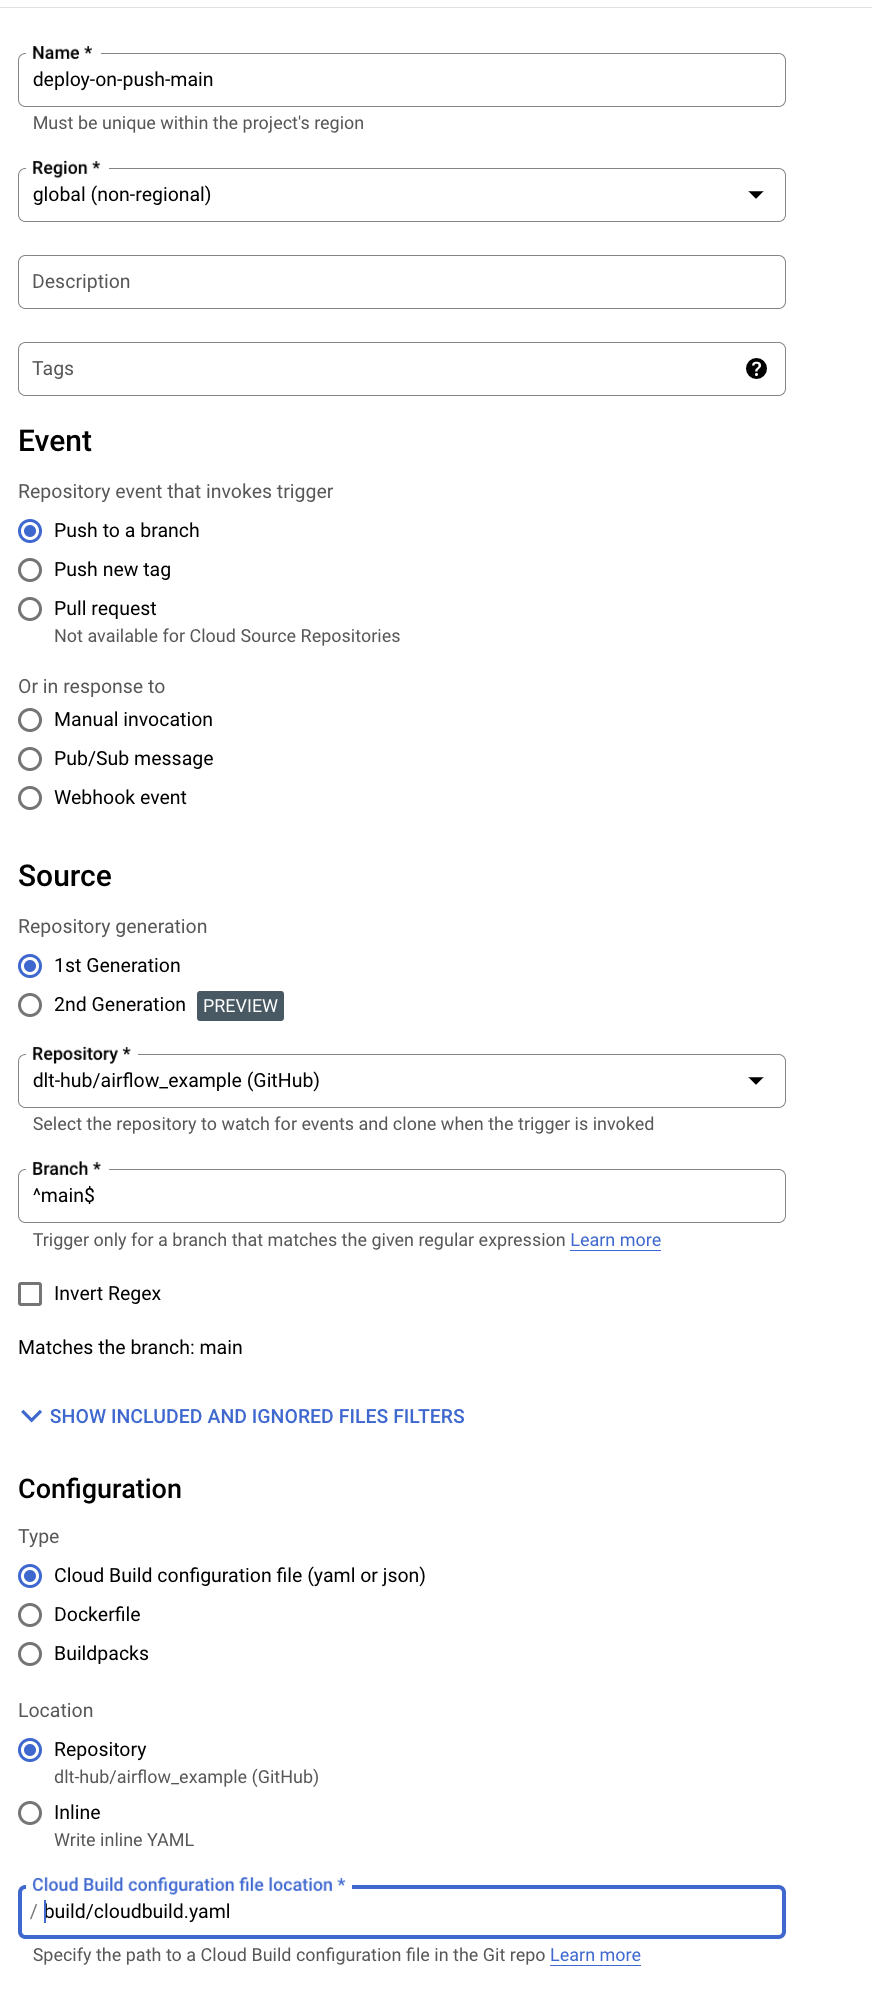
-
Go to Cloud Composer, click on the dags folder, and get the bucket name.

-
In your
cloudbuild.yaml, set the bucket name. -
Make sure your repository code is pushed to the main branch.
-
Run the trigger you built (in Cloud Build).
-
Wait a minute, and check if your files have arrived in the bucket. In our case, we added a
pipedrivefolder, and we can see it appeared.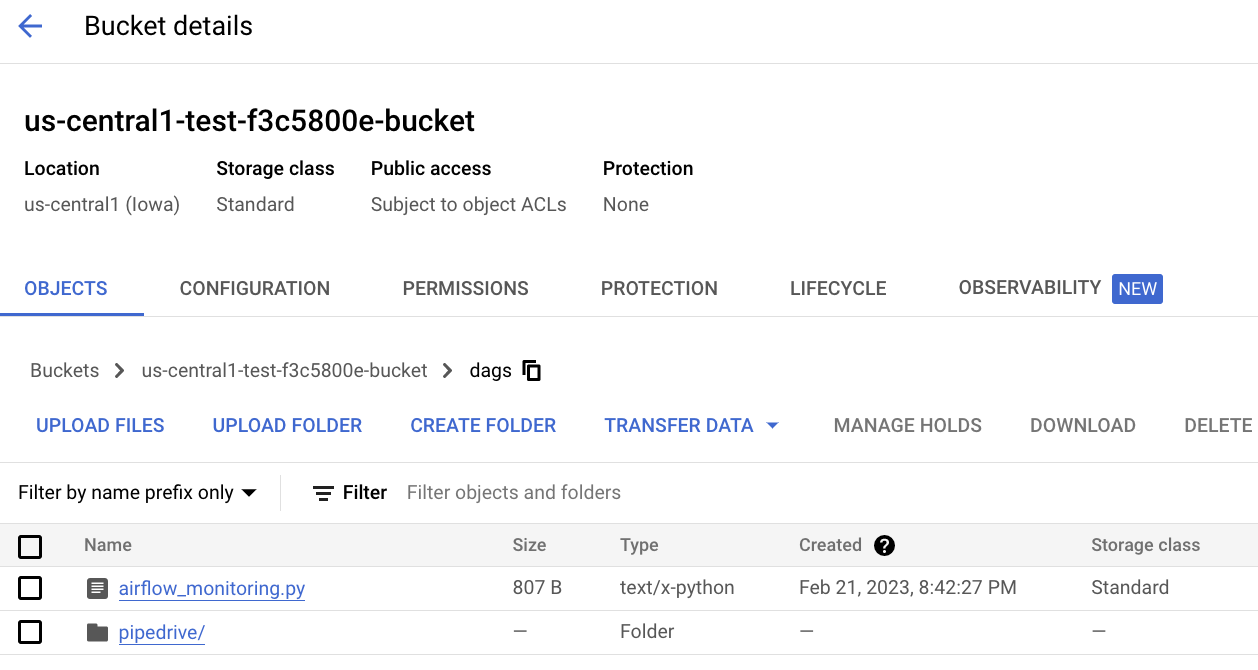
Airflow setup
Assuming you have already spun up a Cloud Composer:
-
Make sure the user you added has rights to change the base image (add libraries). I already had these added; you may get away with fewer (not clear in docs):
- Artifact Registry Administrator;
- Artifact Registry Repository Administrator;
- Remote Build Execution Artifact Admin;
-
Navigate to your composer environment and add the needed libraries. In the case of this example pipedrive pipeline, we only need the
dltlibrary.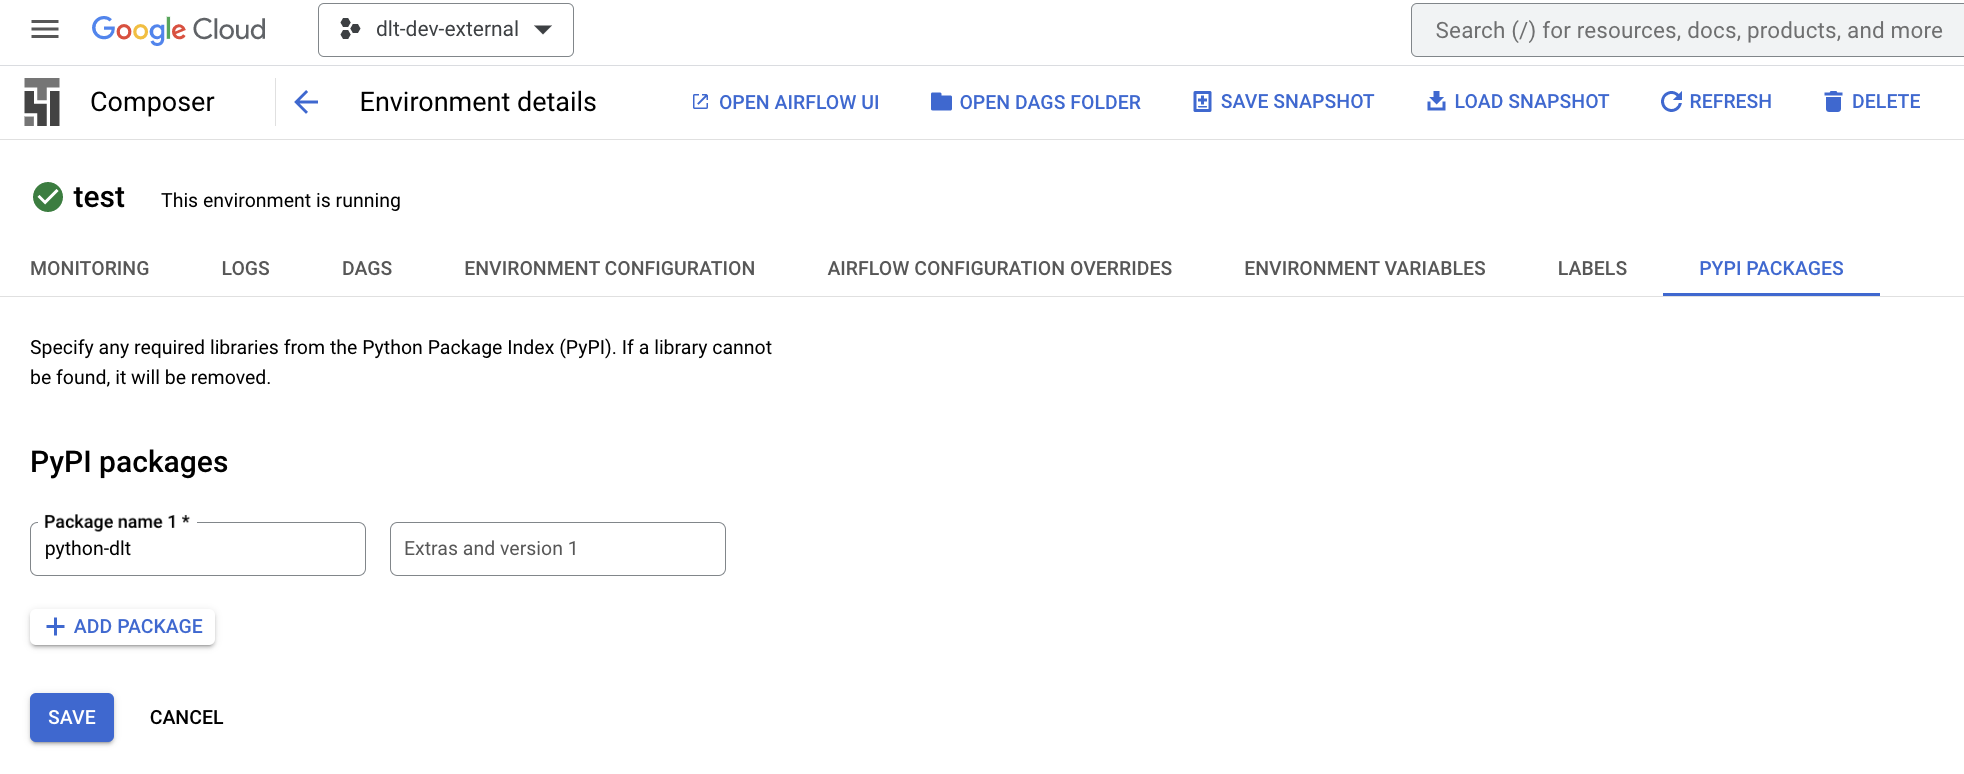
Monitoring
In Airflow, at the top level, we can monitor:
- The tasks scheduled to (not) run.
- Run history (e.g., success/failure).
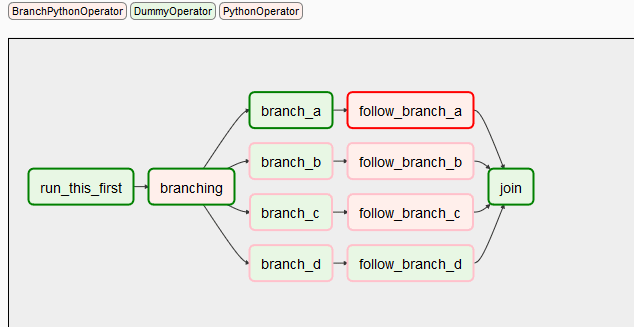
Airflow DAGs:

Airflow DAG tasks:
Troubleshooting
This section will cover the most common probable errors and exceptions.
1. ModuleNotFoundError: No module named ‘{source_name}’
If you received this error, make sure that your repository has been completely copied to the DAGs folder.
If you are running it locally, check your airflow.cfg file (line 4):
# The folder where your airflow pipelines live, most likely a
# subfolder in a code repository. This path must be absolute.
# default: dags_folder = ~/airflow/dags
dags_folder = absolute_path_to_your_project
dags_folder should not lead to the absolute_path_to_your_project/dags folder.
2. ValueError: Can only decompose dlt sources
In this case, you perhaps passed a list of sources to the method add_run as data or another unacceptable data structure and provided decompose = "serialize".
For example:
tasks.add_run(
    pipeline=pipeline,
    data=[source, activities_source],
    decompose="serialize",
)
If data is a DltSource and decompose is “serialize,” it will decompose the source into disjoint connected components (isolated groups of resources) and execute them one after another as separate Airflow tasks.
PipelineTasksGroup can't handle the list of sources in the “serialize” mode; it can only decompose DltSource, so we have to add them sequentially:
tasks.add_run(
    pipeline=pipeline,
    data=source,
    decompose="serialize",
)
tasks.add_run(
    pipeline=pipeline,
    data=activities_source,
    decompose="serialize",
)
Or you should set the decompose = "none" to run it as one Airflow task.
3. DuplicateTaskIdFound: Task id ‘{your_task_id}’ has already been added to the DAG
In the case of the pipedrive pipeline, we tried to load data from “custom_fields_mapping” twice.
# First source configured to load everything except activities from the beginning
source = pipedrive_source()
source.resources["activities"].selected = False

# Another source configured to load activities starting at the given date
# (custom_fields_mapping is included to translate custom field hashes to names)
activities_source = pipedrive_source(
    since_timestamp="2023-03-01 00:00:00Z"
).with_resources("activities", "custom_fields_mapping")
Because of this, we received the following error:
airflow.exceptions.DuplicateTaskIdFound:
Task id ‘pipedrive.pipedrive_custom_fields_mapping’ has already been added to the DAG
Task ids in the task group should still be unique globally, so in this case, we have to exclude “custom_fields_mapping” from activities_source. “Custom_fields_mapping” will be taken from the current state to translate custom field hashes to names:
activities_source = pipedrive_source(
    since_timestamp="2023-03-01 00:00:00Z"
).with_resources("activities")