Deploy your first pipeline with dltHub
New to dltHub and just want to try or learn it? This guide takes you from an empty directory to a sample pipeline running on the managed dltHub platform.
dlthub-start creates a ready-to-run workspace, connects it to dltHub, and configures your coding agent. The agent then deploys and runs a sample pipeline for you.
By the end of this guide, you have loaded data into the Playground destination destination and opened it in the dltHub UI.
Already have a dlt pipeline? See Workspace setup to convert an existing
project into a dltHub workspace.
Before you start
- Python 3.10–3.14 and uv (recommended). See Installation for alternatives.
- A coding agent: Claude Code, Cursor, or Codex.
- A GitHub, Google, or email login.
dlthub-startuses OAuth 2.0 (GitHub, Google, or email) to sign you in and creates your dltHub account on first login. You automatically get a Playground workspace, so you don't need to configure cloud credentials to complete this guide.
dltHub is commercial. Use is governed by the license.
1. Setup your ready-to-run dltHub workspace
Run this command in an empty directory. The directory name becomes your project package name:
uvx dlthub-start@latest
No arguments are needed. The CLI guides you through the following steps:
- Creates a workspace in the current directory.
- Installs dependencies with
uv syncinto.venv. - Signs you in and connects the project to dltHub. An OAuth 2.0 flow opens in your browser and creates your account on first login. The project is then connected to your Playground workspace.
- Configures your coding Agent. Select Claude Code, Cursor, or Codex, and
dlthub-startadds the corresponding dltHub toolkits. - Offers to launch the agent with a handoff prompt that continues the onboarding workflow using the
deploy-run-sample-pipelineskill.
✓ Workspace ready — dependencies installed in .venv
Project package name: starter-test
|-- pyproject.toml
|-- pipeline.py
|-- __deployment__.py
|-- .dlt/
`-- README.md
✓ Logged in and connected to the playground workspace

Which coding agent do you want to use?
● claude
✓ Added claude workbench files

Next step: let claude deploy and run the sample pipeline on dltHub for you.
How do you want to continue?
● Launch claude now and hand it this prompt
Accept the launch, and the agent continues in the same terminal. If you decline, you can launch the agent later and paste the printed handoff prompt.
dlthub-start is the quickest way to explore dltHub end-to-end. The sample pipeline lets you explore the complete dltHub workflow without configuring a destination. Once it's running, you can use the same coding agent to build and deploy a pipeline for your own source.
What you got
starter-test/
├── pyproject.toml      # project dependencies and configuration
├── pipeline.py         # sample REST API pipeline
├── __deployment__.py   # deployable job definitions
├── README.md           # next steps and project guidance
├── .dlt/               # config, secrets, and the .workspace marker
└── .claude/            # agent toolkits: skills + MCP server (or .cursor/ / .codex/)
pipeline.py loads the Sample Shop dataset from a public sample REST API into the platform-managed Playground destination. No warehouse, bucket, or credentials are required.
The pipeline is decorated with @run.pipeline and registered as a deployable job in __deployment__.py. See Deployments for how the manifest works.
2. Let the agent deploy and run the sample
The agent now uses the dltHub platform toolkit to guide the deployment and run the sample pipeline. The toolkit provides the dltHub-specific instructions and commands, while the dltHub CLI and managed platform handle the deployment and execution. You can follow each command in the terminal.
First, it deploys the workspace by syncing your files and registering the jobs defined in __deployment__.py:
uv run dlthub deploy
Synced changed workspace files
Synced changed workspace configuration
3 job(s) found in __deployment__
The scaffold ships three jobs: load_sample_shop (the pipeline), onboarding_success (a notebook that browses the loaded data), and the observability dashboard.
Then it runs the pipeline on the platform and follows the logs until it finishes:
uv run dlthub run load_sample_shop -f
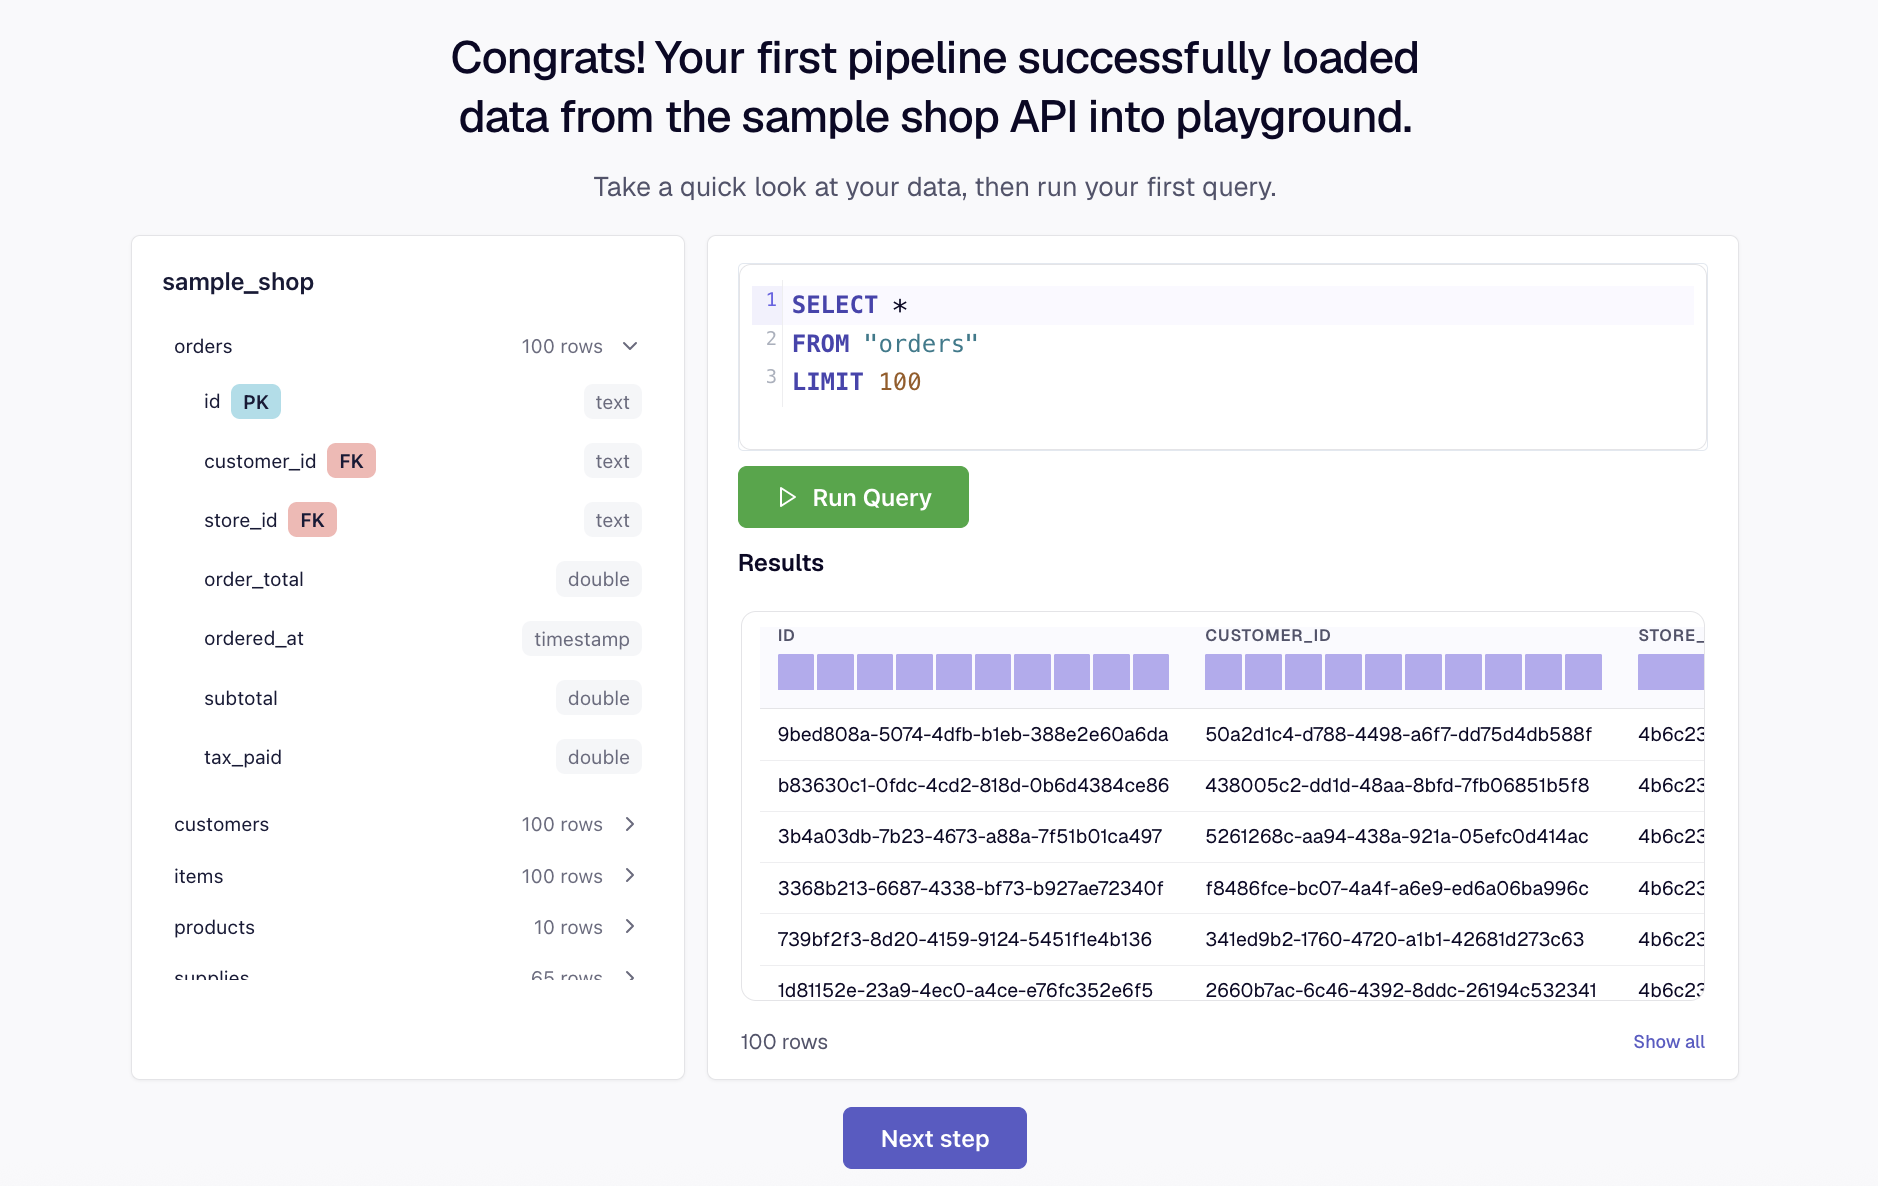
The data lands in the sample_shop dataset on your Playground destination, the managed storage included with every workspace. When the run finishes, the agent prints a link to view it in the web UI:
https://app.dlthub.com/w/<workspace-id>/runs/<run-id>
At this point, your first pipeline has run on the platform and the data is ready to query.
Finally, the agent opens the onboarding_success notebook. This Marimo notebook is included in the starter workspace specifically for this onboarding guide. It lets you browse the tables created by the Sample Shop pipeline and confirms that the data was loaded successfully.
3. Rerun and inspect the pipeline
After the first successful run, you can rerun the pipeline or open your workspace in the dltHub UI. To rerun the pipeline on the managed platform and follow its logs until it finishes, run:
uv run dlthub run load_sample_shop -f
To open the connected workspace in your browser, run:
uv run dlthub show
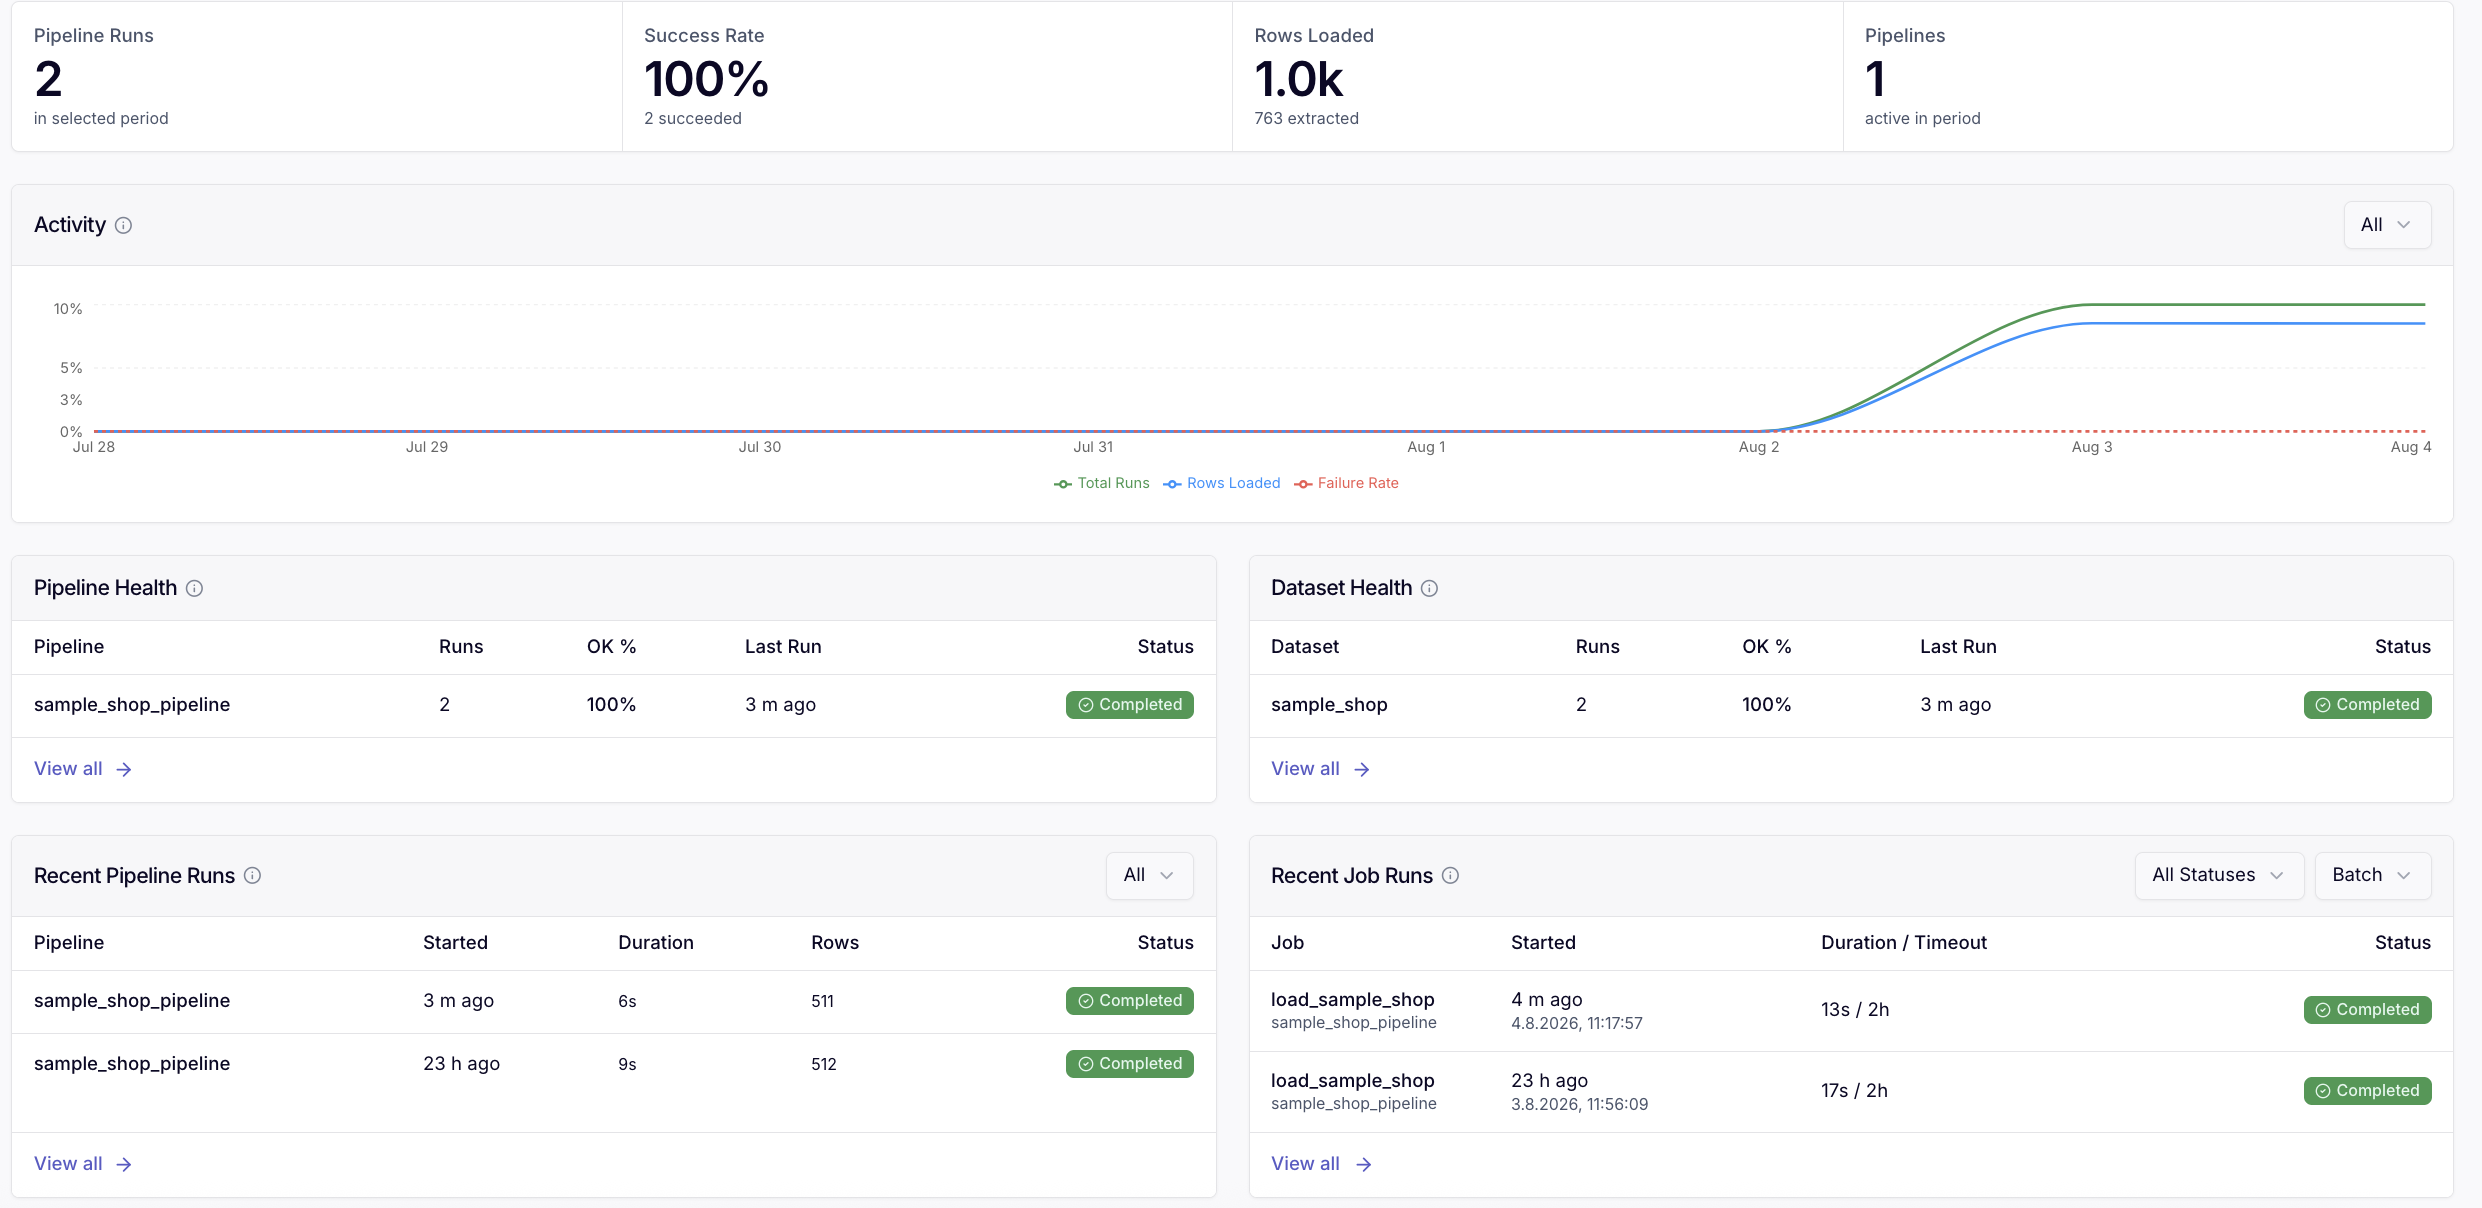
For ongoing monitoring, open the workspace observability dashboard from the Notebooks section. Unlike the onboarding_success notebook, this dashboard is not specific to the sample pipeline or this tutorial. It is available as a general workspace tool for inspecting your pipelines and datasets. You can use it to review pipeline metadata, query destination data, inspect traces and exceptions, check run history, and verify incremental loading behavior.
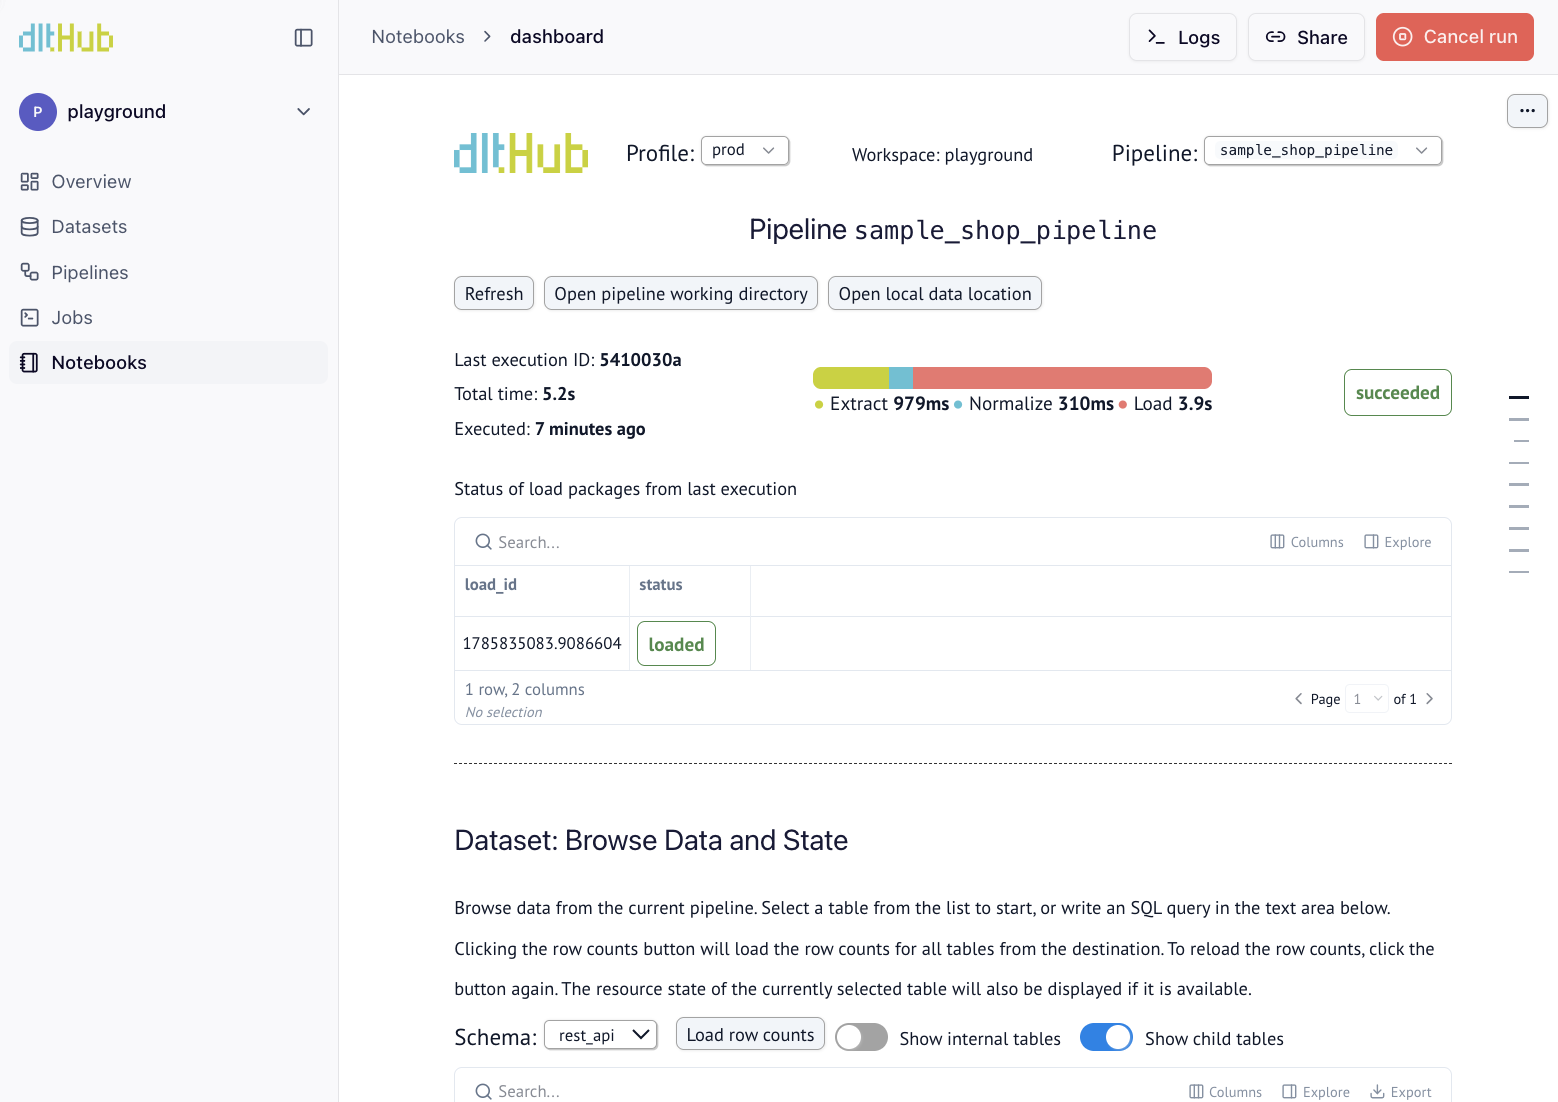
To run jobs locally instead, use dlthub run local. Local runs use the dev Profile.
4. Continue with your own setup
Point production at a cloud destination
The Playground destination is great for testing but isn't meant for production. For real data, you'll want to load into a destination you own.
You can use profiles to run the same pipeline with different destinations and credentials in development and production. See Workspace setup and Profiles for the complete configuration.
Set the destination on the dlt.pipeline inside your decorated job. Use a named destination such as warehouse so that the same pipeline code can run against different destinations in dev and prod profile:
import dlt
from dlt.hub import run


@run.pipeline("sample_shop_pipeline")
def load_sample_shop():
    pipeline = dlt.pipeline(
        pipeline_name="sample_shop_pipeline",
        destination="warehouse",
        dataset_name="sample_shop",
    )

    pipeline.run(...)
The name warehouse is an alias. Configure what it points to for each profile in the .dlt/ directory.
For example, use DuckDB for local development:
.dlt/dev.config.toml
[destination.warehouse]
destination_type = "duckdb"
Then configure a cloud destination for production:
.dlt/prod.config.toml
[destination.warehouse]
destination_type = "snowflake"
Add the corresponding Snowflake credentials to .dlt/prod.secrets.toml:
[destination.warehouse.credentials]
database = "your_database"
username = "your_username"
password = "your_password"
host = "your_account_identifier"
warehouse = "your_warehouse"
role = "your_role"
Local runs, via dlthub run local, use the dev profile, while batch jobs on the dltHub platform use the prod profile. The pipeline code therefore remains unchanged while the destination changes between environments.
Supported destinations include MotherDuck, BigQuery, Snowflake, S3, and many more.
Schedule the pipeline
Scheduling is declarative: add a trigger to the job and redeploy.
from dlt.hub import run
from dlt.hub.run import trigger


@run.pipeline("sample_shop_pipeline", trigger=trigger.schedule("*/10 * * * *"))
def load_sample_shop():
    ...
uv run dlthub deploy
See triggers and scheduling for cron, intervals, and follow-ups.

You can also manage the job directly from the UI. Open the Actions menu next to the job to start a run, update its schedule, or remove the schedule.
Add alerting
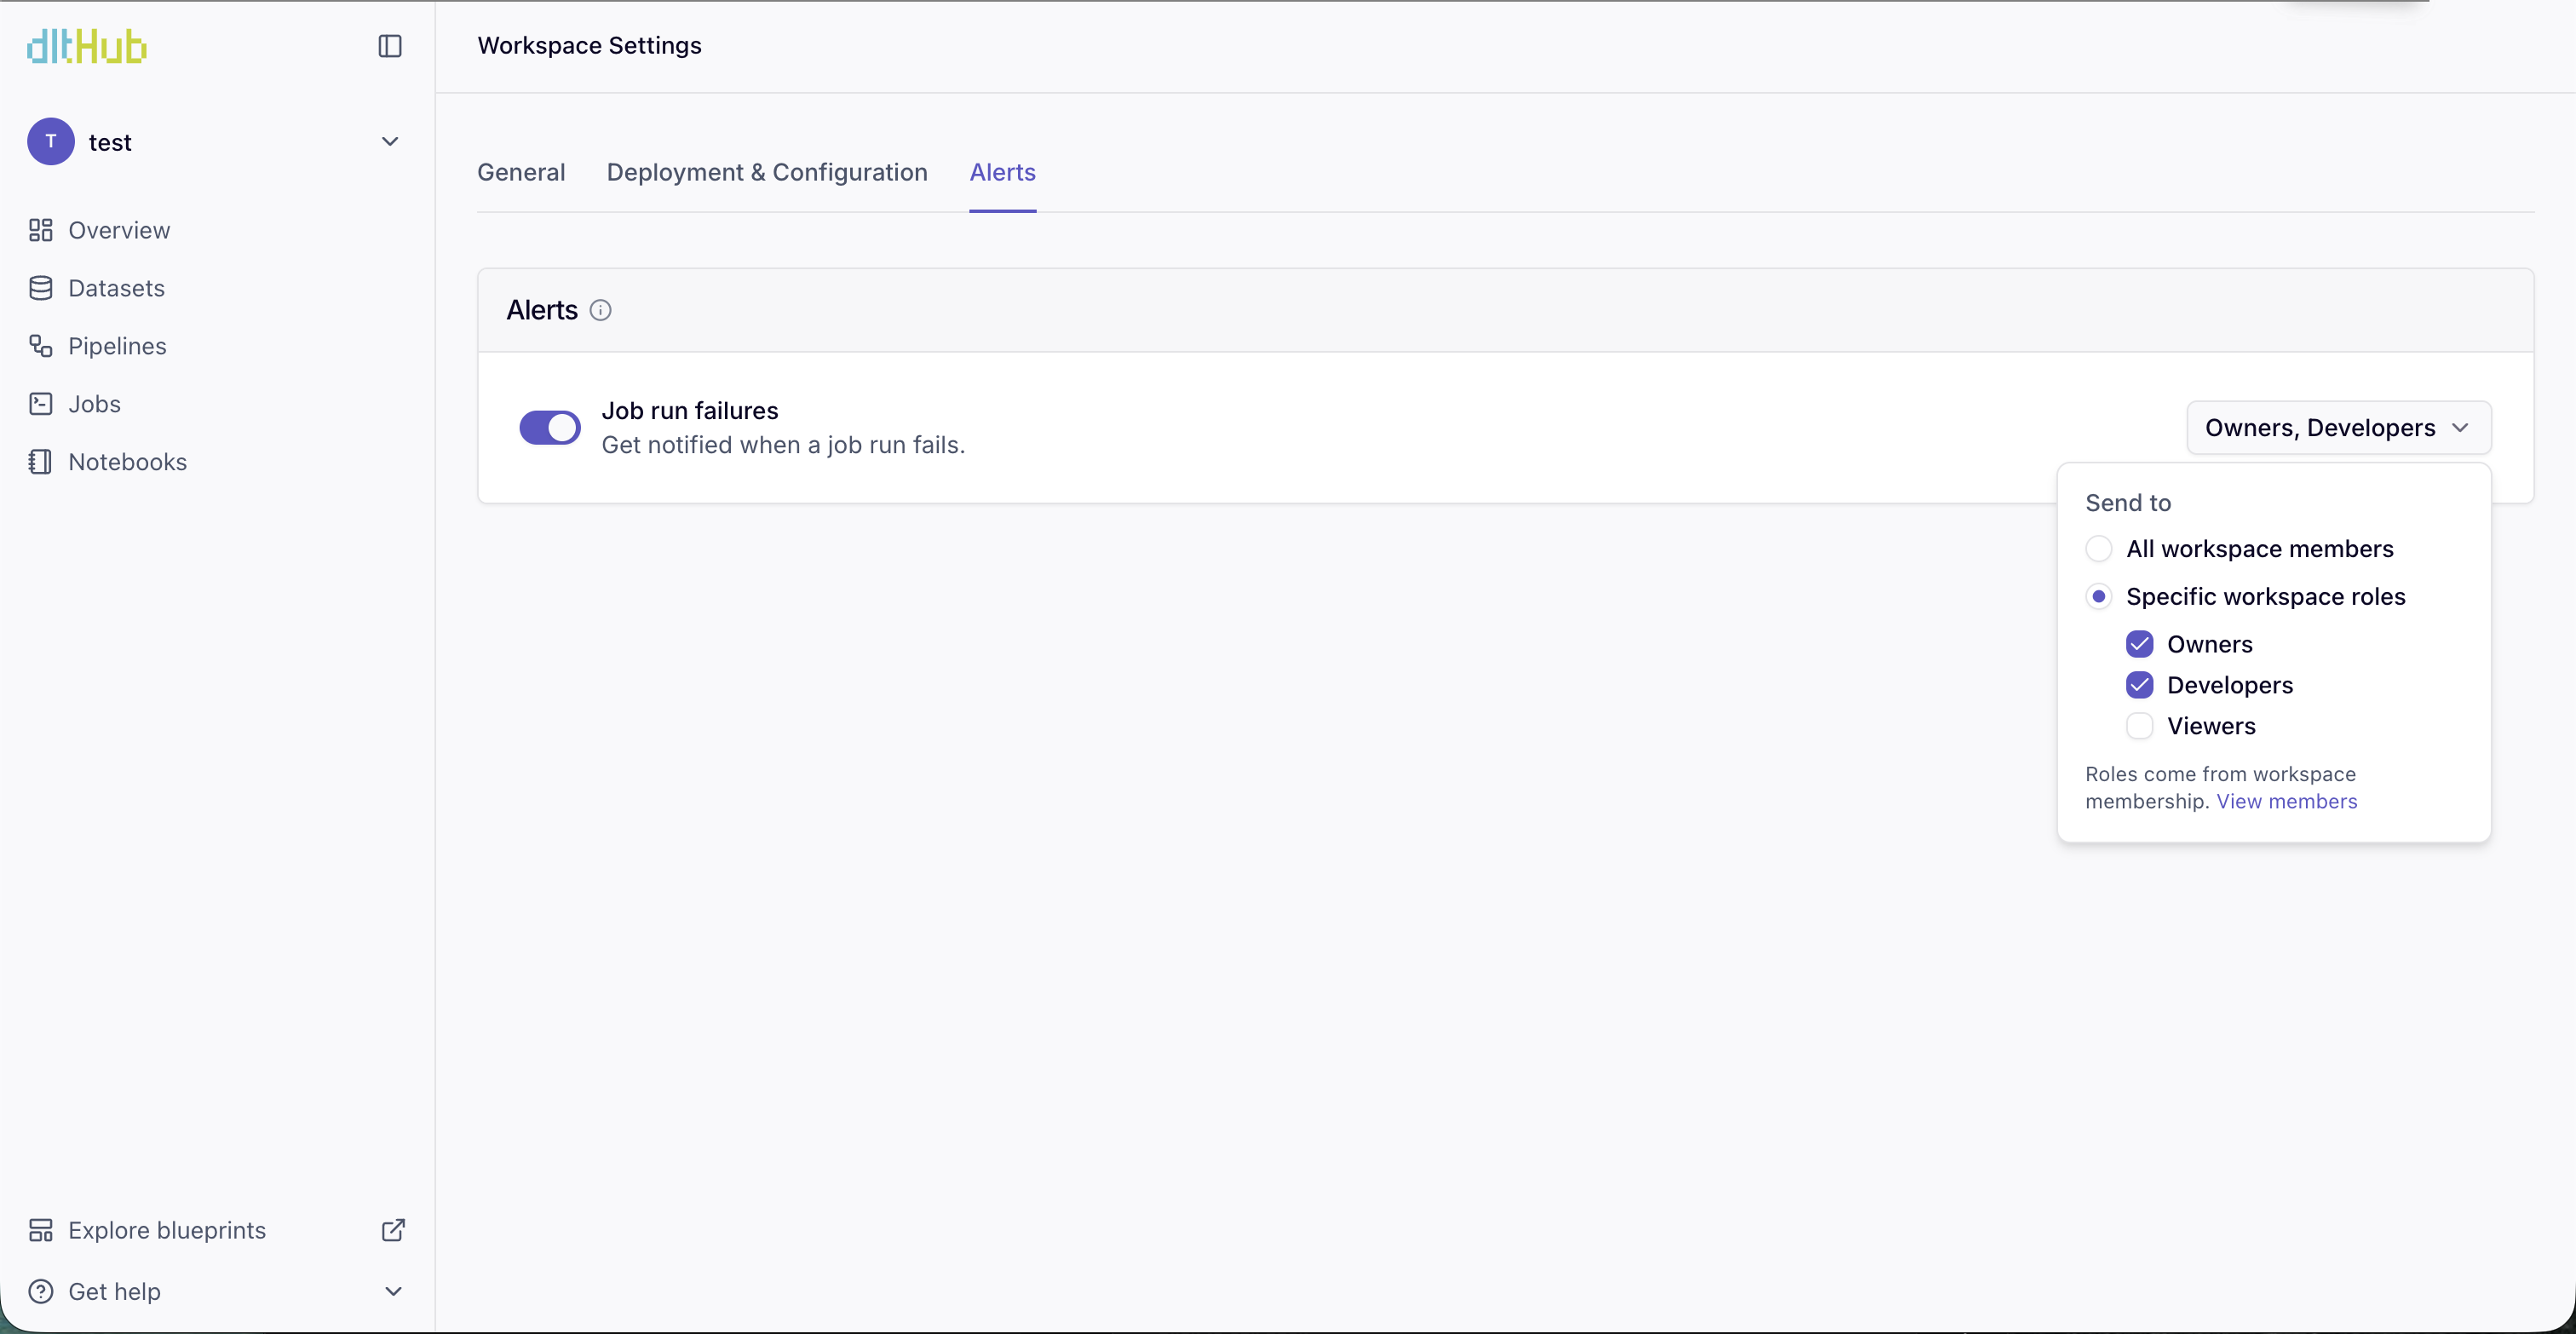
Get notified when a job run fails via email. Go to Workspace Settings > Alerts, toggle on job run failure alerts, and choose who gets notified: all workspace members or specific roles (Owners, Developers, Viewers).
Build your own pipeline with your coding agent
With the sample running, the same agent session is ready to build a pipeline for your own source. Ask it:
Help me get started building and running a data pipeline on dltHub
Describe the source in plain language and the agent does the rest, it has the dltHub skills and MCP server wired in from step 1:
- Writes the pipeline and registers it as a job in
__deployment__.py. - Deploys and runs it on the platform, iterating on failures.
- Opens the dashboard so you can explore the loaded data right away.
Note that the sample loads into the Playground destination. When you build your own pipeline, you pick a real destination of your own.
The sample pipeline uses the Playground destination. For your own pipeline, you can continue using Playground while experimenting or configure a production destination.
For the production-grade path (auth, incremental loading, more endpoints) see the dltHub AI Harness.
Troubleshooting
uvx: command not found
Install the CLI with pip install dlthub-start (into your current Python environment) and run dlthub-start instead. The CLI still offers to install uv before syncing the generated workspace dependencies.
My workspace landed in a playground/-1 subdirectory
That's expected when the target directory wasn't empty. Rather than refuse, the CLI scaffolds into a free directory and prints where it went.
- To control the location, pass an explicit empty target:
uvx dlthub-start@latest my-workspace - Or run from an empty directory.
The CLI never writes into a non-empty directory. It picks a fresh one alongside it.
uv sync fails
Rerun with --verbose to see subprocess output:
uvx dlthub-start@latest my-workspace --verbose
If the scaffold was created successfully, you can also enter the workspace and run uv sync directly after fixing the underlying dependency or network issue.
Next steps
- Convert an existing dlt pipeline into a workspace and bring it onto the platform.
- Ask your coding agent to build a pipeline for your source.
- Reshape your data with Transformations.
- Add data quality checks to catch issues early.