dltHub CI/CD deployment via GitHub Actions
Follow this guide to manage dltHub workspace deployments using GitHub Actions for CI/CD. By the end, every change to your ELT solution will follow good software development practices: issues, branches, pull requests, reviews, etc.
Benefits:
- Auditable: Everything the workspace does is declared as code, in version control
- Quality control: Every change goes through automated checks and requires human review before reaching production.
- Change isolation: Changes never break production by using isolated workspaces and dedicated destinations.
These properties are essential to enable AI-coding and agents productivity.
Development lifecycle
This section starts with a flowchart of the dltHub + GitHub development workflow. It is followed by an illustrative scenario.
Scenario: how to fix a pipeline
-
Branch off
main.git checkout -b <feature-branch-name> -
Make your changes (make a source incremental, add a pipeline, enable schema contract, etc.)
-
Commit your code. Code quality checks and tests will run locally. This enables fast iterations for you and your agents.
git commit -m "made quickbooks source incremental" -
Push your code and open a pull request. This will trigger GitHub Actions to run automated checks remotely.
git push
# include `--label` to trigger staging deployment
gh pr create --fill --label staging-deploy -
Add the
staging-deploylabel on the GitHub pull request to trigger deployment to the staging dltHub workspace. Then, you can run pipelines on dltHub with small data loads.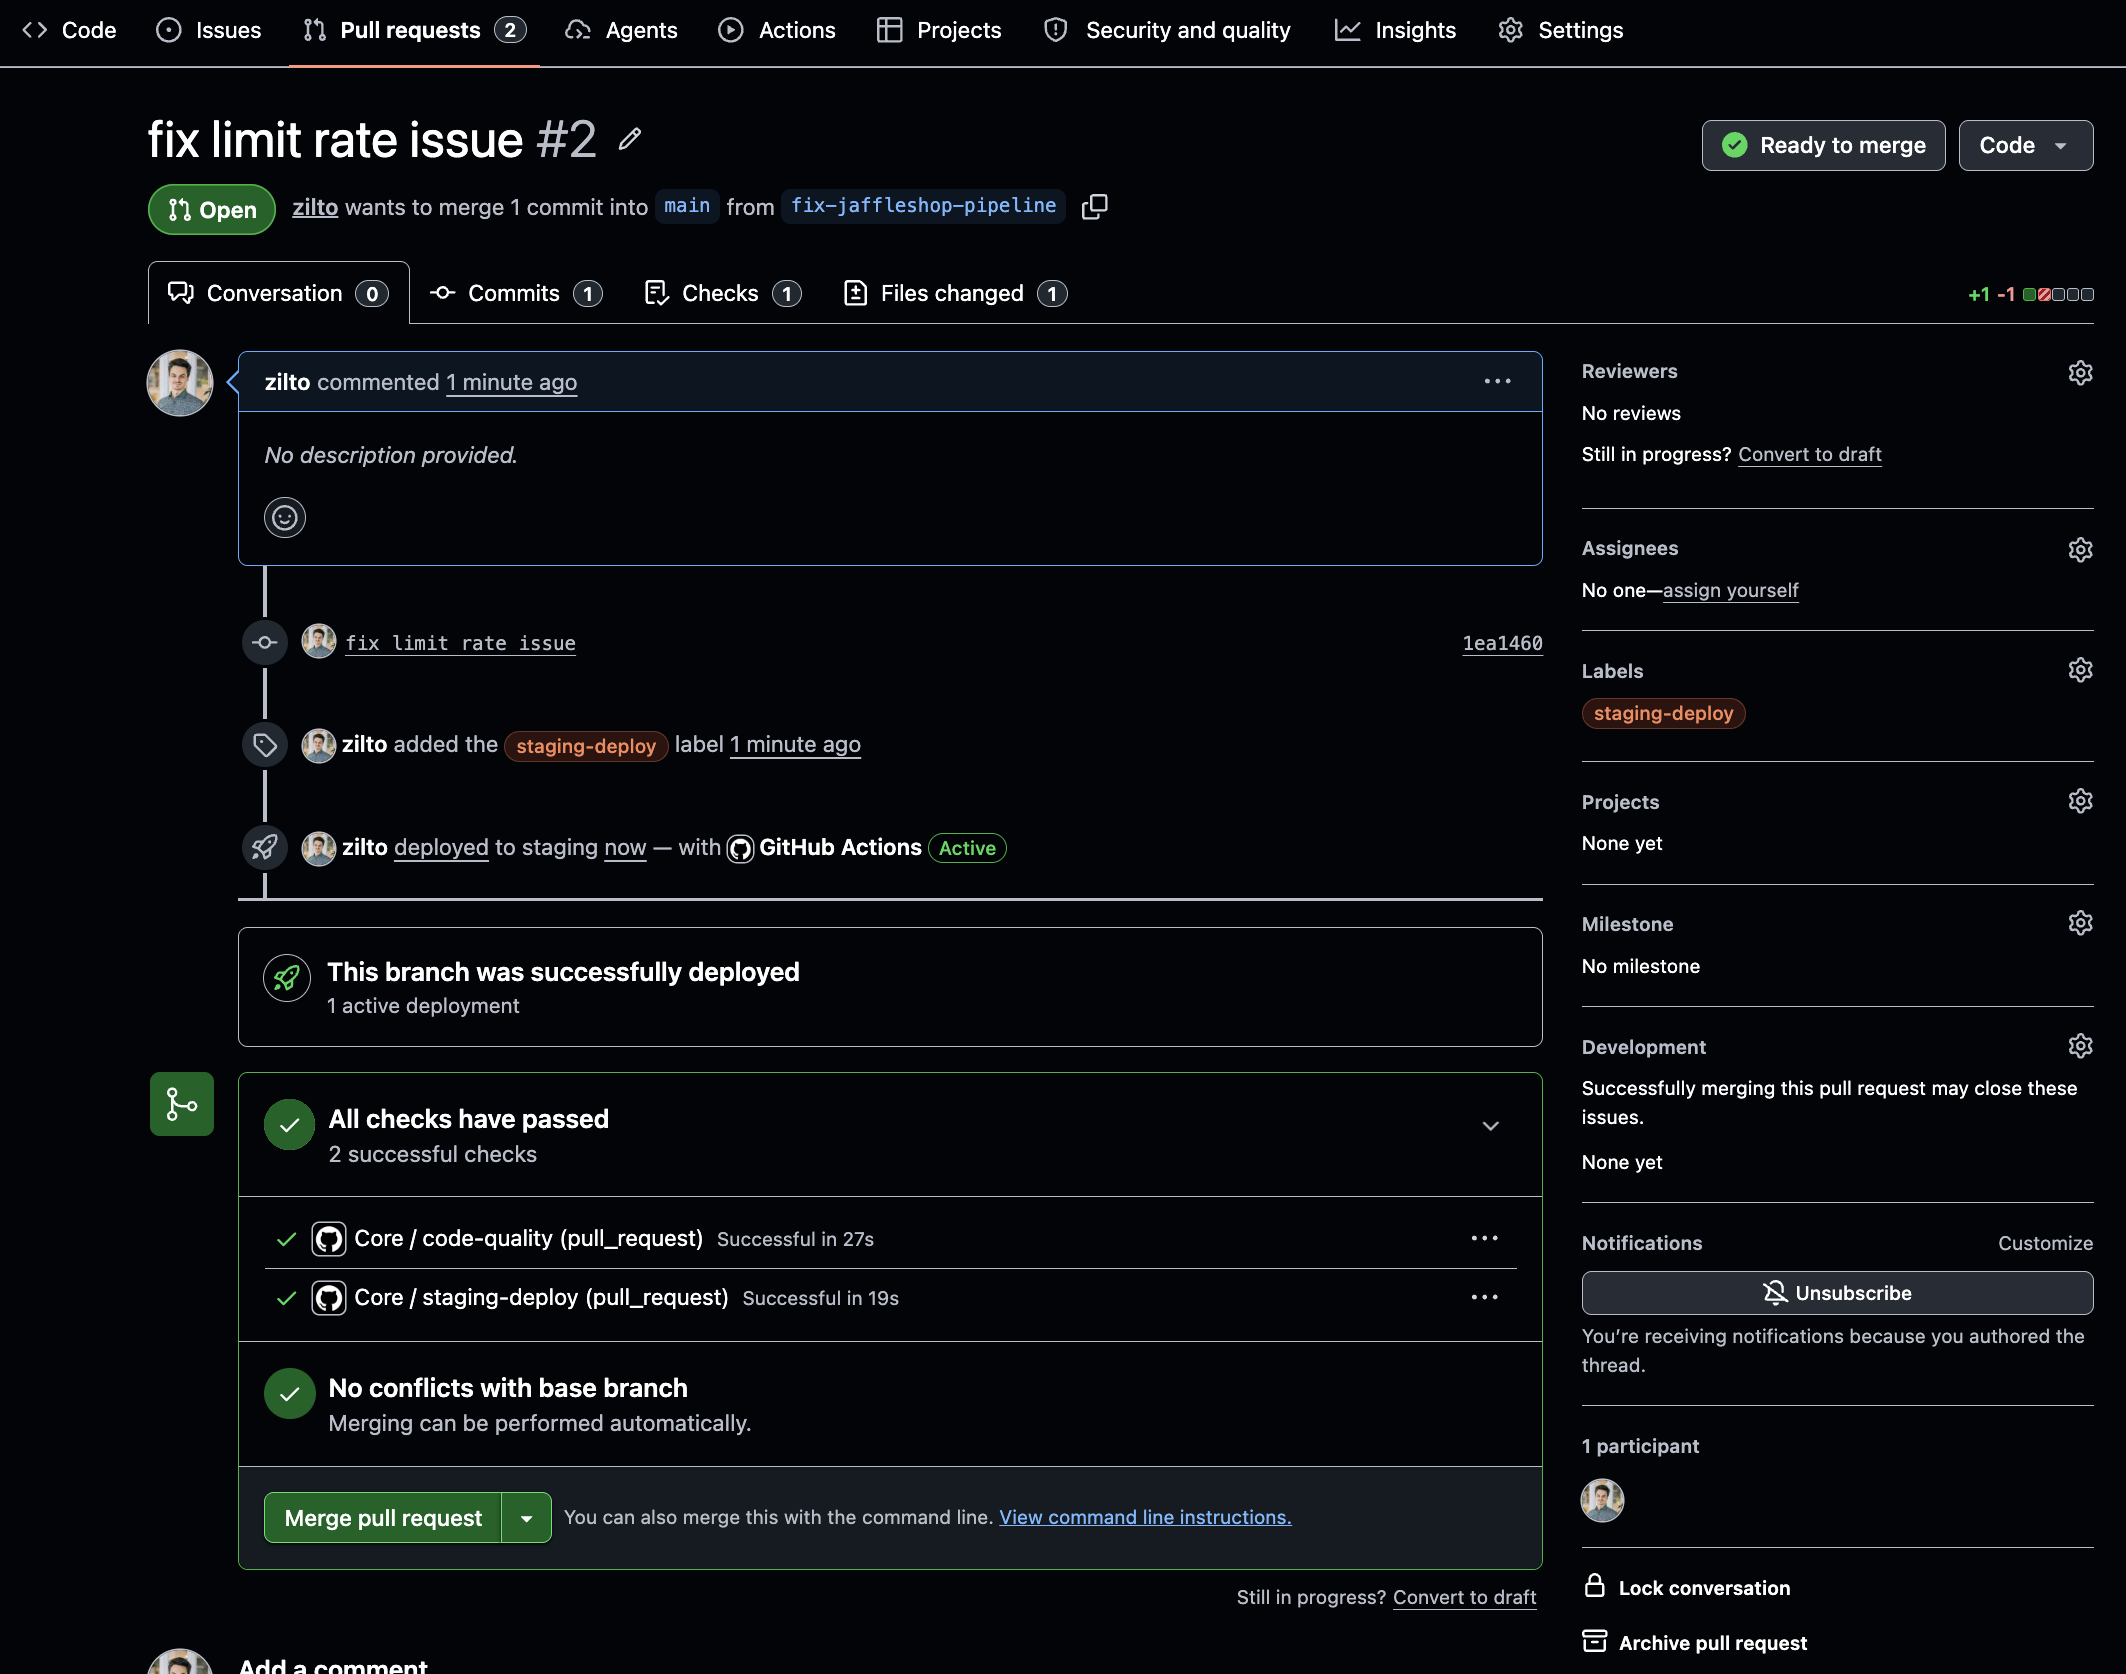
-
Get a pull request review of the code and the run results on the staging workspace.
-
Merge to
main. This will deploy the newmainbranch to the production dltHub workspace.
Teams using dltHub
This approach allows team to scale from 10s to 100s to 1000s of pipelines without frictions. Good practices and hard requirements are codified. When something fails, you trace the issue to specific code changes.
This guide is a starting point. The workflow can be tailored to your organization.
Get in touch with the dltHub Customer Success team- Add a source: Create the source under
workspace/sources. Then, define the pipeline inworkspace/__deployment__.pyand register it in__all__. - Manage Python dependencies: Avoid Python dependency conflicts or slow pipeline jobs by creating dependency groups in
workspace/pyproject.toml. Then, individual pipelines can specify@run.pipeline(..., require= {"dependency_groups": ["<group-name>"]}) - Add environments: Tailor your workflow and add environments as you need. Simply add another
.dlt/<env>.config.tomlwith matching dltHub workspace and GitHub environment. - Promote via tags instead of
main: Manually deploy tomainby using an explicit release step rather than deploying every merge. Editprod-deploy.yamlto trigger on commits with specific tags.
Repository content
Here's an overview of the files found in the repository:
├── .github/workflows/           # GitHub Actions workflows
│   ├── pr-checks.yaml           # lint, type-check, test; optional staging deploy
│   └── prod-deploy.yaml         # deploy to production on push to `main`
├── workspace/                   # dltHub workspace
│   ├── .dlt/                    # workspace configuration
│   │   ├── .workspace
│   │   ├── config.toml          # config shared by all profiles
│   │   ├── prod.config.toml     # production-specific config
│   │   └── stg.config.toml      # staging-specific config
│   ├── sources/                 # dlt source definitions
│   ├── notebooks/               # notebooks definitions
│   ├── __deployment__.py        # production deployment: defines all pipelines
│   ├── __staging__.py           # staging deployment: sets limits for staging runs
│   └── pyproject.toml           # configure Python runtime and dependencies
├── tests/                       # tests for sources, pipelines, deployments
├── justfile                     # developer commands
├── pyproject.toml               # configure developer tooling
└── uv.lock                      # single lockfile for workspace + development
Key design decisions:
-
Separate developer tooling and dltHub workspace. Only the content of
workspace/is deployed to dltHub. The developer tooling, tests, and CI/CD automations are defined outside of it. This handled usinguvworkspaces and the filespyproject.tomlandworkspace/pyproject.toml. -
dltHub workspace configurations committed to the repository
workspace/.dlt/{prod,stg}.config.toml. Nonsensitive configuration changes are versioned-controlled, tested, and reviewed along the code. Sensitive credentials (i.e., secrets) are set on the dltHub platform or via an external secret provider. -
workspace/__deployment__.pyis the single reviewable source of truth for the dltHub workspace. It includes all the pipelines, jobs, and data apps definitions.workspace/__staging__.pyreads its content and applies additional configuration for staging (e.g., remove scheduling, set data load limit)
Guide
Prerequisites:
1. Set up GitHub repository
-
Clone the blueprint repository, then collapse its commit history into a single commit.
git clone https://github.com/dlt-hub/dlthub-cicd-blueprint.git
cd dlthub-cicd-blueprint

# drop the blueprint's `.git` history and start with a fresh history
rm -rf .git
git init -b main
git add .
git commit -m "Initial commit from dltHub CI/CD blueprint" -
Create your own GitHub repository from the clone, and push it
# creates the repo on GitHub
gh repo create <your-org>/<your-repo> --private
git remote add origin https://github.com/<your-org>/<your-repo>
git push -u origin main
2. Configure dltHub workspaces
-
Login to dltHub. The command will open a browser page for you to authenticate.
cd workspace
uv run dlthub logininfoYou may need to upgrade the dltHub client. Run this command, then rerun the above:
uv sync --upgrade-package dlthub-client -
Create the
stagingworkspace and set itsworkspace_idinworkspace/.dlt/stg.config.toml# workspace/.dlt/stg.config.toml
[runtime]
workspace_id = "<staging-workspace-id>" -
Get a dltHub workspace API key and set it on the GitHub repository
gh api repos/{owner}/{repo}/environments/staging --method PUT
gh secret set DLTHUB_API_KEY --env staging --body "<staging-workspace-api-key>" -
Create the
productionworkspace and set itsworkspace_idinworkspace/.dlt/prod.config.toml# workspace/.dlt/prod.config.toml
[runtime]
workspace_id = "<production-workspace-id>" -
Get a dltHub workspace API key and set it on the GitHub repository
gh api repos/{owner}/{repo}/environments/production --method PUT
gh secret set DLTHUB_API_KEY --env production --body "<production-workspace-api-key>" -
Commit configurations and push to GitHub.
git add .
git commit -m "configured dlthub workspaces"
git push
If everything is set up properly, the push to main will trigger GitHub Actions to check the code and deploy to dltHub. It takes around 1 minute to complete.
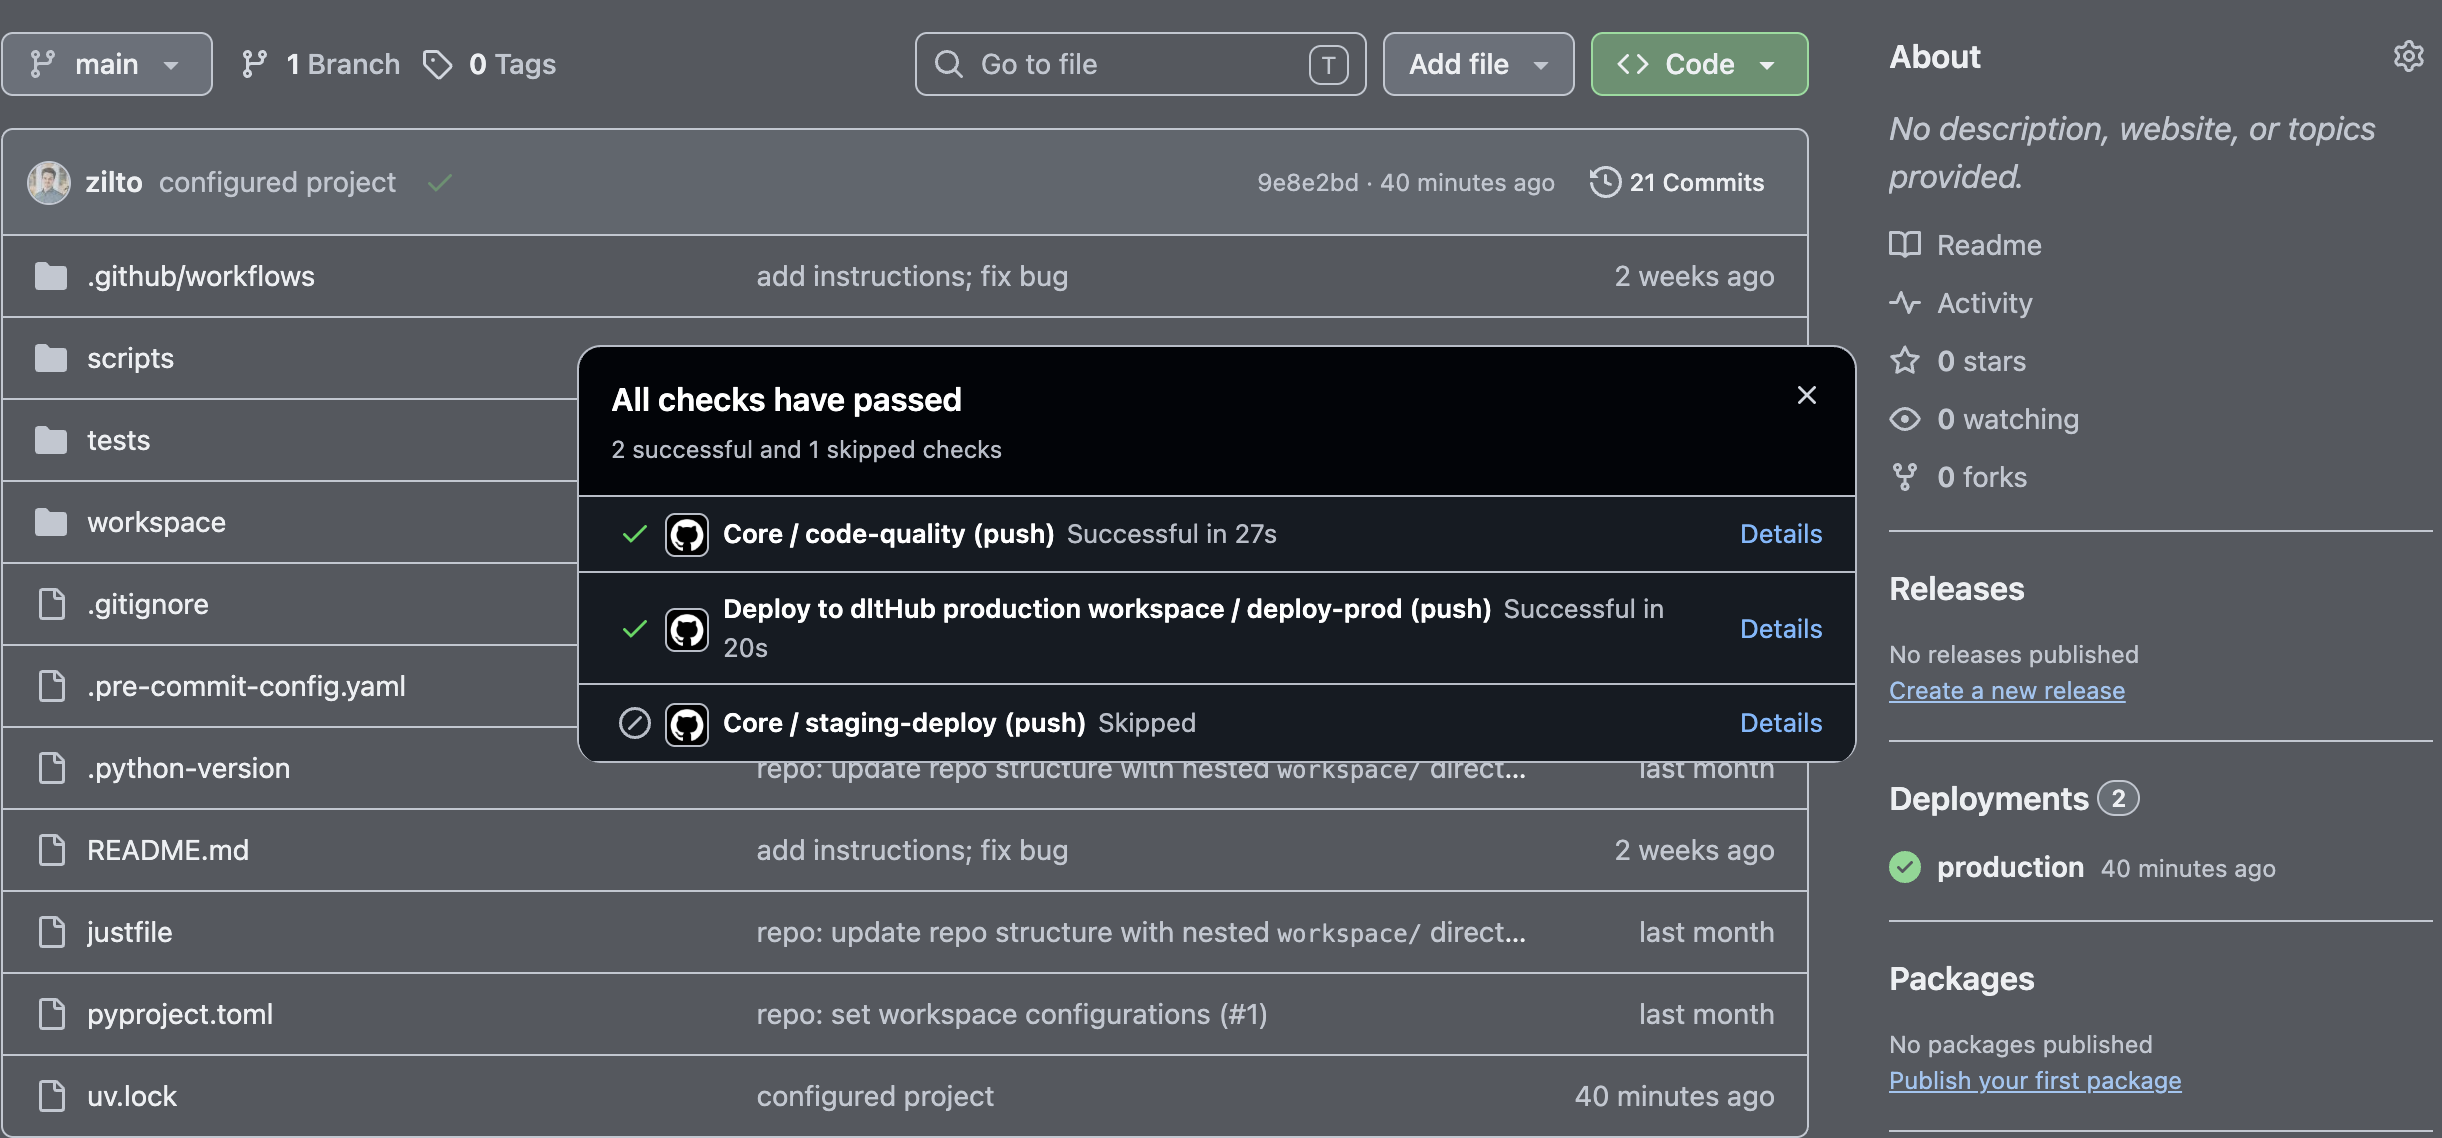
We suggest setting branch protection rules on GitHub to make sure that failing automated checks block PR from being mergeable and require at least 1 pull request review before merging.
Next steps
- Deployments — the manifest model behind
dlthub deploy - Profiles — how
dev,prod, andaccessprofiles work - Secrets management — vaults and access controls for production secrets
- Triggers and scheduling — cron, intervals, follow-ups, freshness
- Environment variables — workspace- and profile-scoped process environment
- Monitoring and debugging — logs, dashboards, and failed-run diagnostics
- Workspace API keys